
Firebase/Firestore Integration with Pabbly Connect:
This documentation provides a detailed, step-by-step guide for integrating your Firebase/Firestore account with Pabbly Connect. Following these instructions will enable you to establish a seamless connection between the two platforms.
Authentication Steps:
Follow these steps to obtain the necessary Client ID and Client Secret from Google Firebase Console.
Obtain Client ID and Client Secret:


Integration Steps:
1. Select "Firebase/Firestore" Trigger:
.png")
2. Configure the Connection:
.png")
===========================TRIGGERS===================================


===========================ACTIONS====================================
.png")
.png")
.png")
.png")
Successful Integration:
Upon completing the above steps, your Firebase/Firestore account will now be successfully integrated with Pabbly Connect. You can utilize different actions according to your purpose.
With this integration, you can automate processes through Pabbly Connect, improving your workflow and enhancing your productivity.
If you encounter any issues or require further assistance, feel free to reach out to our support team for help.
Happy integrating!
This documentation provides a detailed, step-by-step guide for integrating your Firebase/Firestore account with Pabbly Connect. Following these instructions will enable you to establish a seamless connection between the two platforms.
Authentication Steps:
Follow these steps to obtain the necessary Client ID and Client Secret from Google Firebase Console.
Obtain Client ID and Client Secret:
- Sign in to the Google Cloud Platform using your Google credentials.
- Click Select a project > new project ( In our case we have given the name ("Google Cloud Firestone").
- Enter the desired project name, and click the "CREATE" button.
- Navigate to "APIs & Services" and select "Library."
- Navigate to "APIs & Services" and select "Library."
- Search for and enable the following required APIs:
Google Cloud Firestore API
Firebase Management API
Google Cloud Storage JSON API
- As you type, the desired service option should display. Click on the API or service you wish to connect with Pabbly Connect.
- Click the "ENABLE" button to enable the selected API. After enabling it will look like this:
- Return to "APIs & Services" > "Library" and enable the two remaining required APIs as mentioned in step 5.
- Open the OAuth consent screen settings.
- Choose the "External" option, add test users, and click "CREATE."
- Fill in the required fields as follows, and then click the "Save" button.
- Application name: Enter the name of the application requesting consent.
- Scopes for Google APIs: Click "Add Scope" to open the dialog and add the required scopes.
SERVICE/API REQUIRED SCOPES
- https://www.googleapis.com/auth/cloud-platform Cloud Firestore API
- https://www.googleapis.com/auth/datastore Google Cloud Storage JSON API
- https://www.googleapis.com/auth/devstorage.read_write Firebase Management API
- https://www.googleapis.com/auth/firebase.readonly
Note: There is no need to submit your consent screen and application for verification by Google. Simply click the "Save" button after filling in the required fields on the same page.
- Proceed to "Credentials." Click "+CREATE CREDENTIALS" and select "OAuth Client ID."
- Fill in the necessary fields as follows and then click "CREATE".
Application type: Web application
Name: e.g. Pabbly Connect
Authorized redirect URIs: https://connect.pabbly.com/callback-url (Copy the provided URL and insert it into the designated section as specified.). - Copy your Client ID and Client Secret values and store them in a safe place.
- Access the Google Firebase Console by signing in with your Google credentials.
- Initiate the creation of a new project by selecting the "Create a project" option.
Integration Steps:
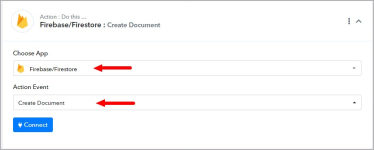
1. Select "Firebase/Firestore" Trigger:
- Within Pabbly Connect, navigate to the trigger step and choose "Firebase/Firestone" as the trigger you wish to perform. Select an action event, such as "New Document"
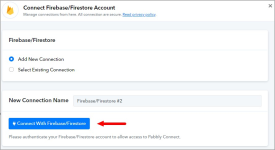
2. Configure the Connection:
- To establish a connection, select "Add New Connection" and log in to your Firebase/Firestore account. If you already have an existing connection, you can opt for "Select Existing Connection" instead.
===========================TRIGGERS===================================
Firebase/Firestore: New Document(Trigger Event)
- Use Case: To capture the response for the newly created document within the project.
- Select the "New Document" trigger, and connect your Firebase/Firestore account.
- Provide all the required details and choose the Order By field.
- Please ensure to enable the map button and enter the field name for which the records will be fetched. The default value is createTime.
Note: Make sure to create a field "createTime" in your document, and choose the field type as "timestamp". Also, note that while creating the document through the action event "Create Document" enter the "createTime" value in the Key field, and enter the "timestampValue" value in the "CreateTime Type" field and "[{{modifyDateTime_Y-m-d}}]T[{{modifyDateTime_H:i:s}}]Z" value in "CreateTime Value" field.
===========================ACTIONS====================================
Firebase/Firestore: Create Document(Action Event)
- Use Case: To create a document within the project.
- Select the "Create document" action, and connect your Firebase/Firestore account.
- Provide all the required details and provide keys for the collection. List of all the keys -
(string, boolean, map, array, null, timestamp).
Note: Make sure not to enter incorrect "Values" and "Type" in the Keys field, as doing so may disrupt the JSON structure and prevent the correct population of values within the Firebase collection. (Check the screenshot for reference). - The correct way to write array and map values is as follows:
"Array"- { "values": [ { "integerValue": 34 }, { "integerValue": 343 } ] }
"Map value" - { "fields": { "nested boolean inside map": { "booleanValue": true } } } - Once all the necessary information has been provided, please click on the "Save and Send Test Request" button.
Firebase/Firestore: List Collections(Action Event)
- Use Case: To retrieve all available datasets in a specific group.
- Once all the necessary information has been provided, please click on the "Save and Send Test Request" button.
Firebase/Firestore: List Projects(Action Event)
- Use Case: To retrieve all available projects.
- Once all the necessary information has been provided, please click on the "Save and Send Test Request" button.
Firebase/Firestore: List Documents(Action Event)
- Use Case: To get a list of all the documents.
- Once all the necessary information has been provided, please click on the "Save and Send Test Request" button.
Successful Integration:
Upon completing the above steps, your Firebase/Firestore account will now be successfully integrated with Pabbly Connect. You can utilize different actions according to your purpose.
With this integration, you can automate processes through Pabbly Connect, improving your workflow and enhancing your productivity.
If you encounter any issues or require further assistance, feel free to reach out to our support team for help.
Happy integrating!
Attachments
Last edited by a moderator: