
Custom fields of an application are the dynamic fields configured by the app users in their app dashboard. Many applications like MailChimp, Mailerlite, Pabbly Email Marketing etc. allows user to manage their contacts, lists, subscribers etc based on custom fields.
So, it is important to make the app integration compatible with custom fields.
Here are the steps to be followed for configuring the action's request body JSON with Custom fields.
In this way, you can configure custom fields in your action which will dynamically populate the fields in your app's action at the frontend.
So, it is important to make the app integration compatible with custom fields.
Here are the steps to be followed for configuring the action's request body JSON with Custom fields.
- Identifying the request body JSON structure.
Here you need to identify the JSON structure that may support the custom fields. It may consist of an array of custom fields JSON object or a simple JSON object as shown in the below example:
Example 1: Custom Fields as a JSON object
JSON:{ "email": "[email protected]", "name": "John", "fields": { "company": "MailerLite", "address": "B 20, White Street, Banglore", "phone": "+14568455487", "zip": 4566685 } }
In this case, you can see the "fields" is the JSON object of custom fields Key-Value pair in the request body. So, the request body of the action in Pabbly Connect integration should include the following variables to generate the dynamic custom fields in the frontend.
JSON:{ "email": "{{email}}", "name": "{{name}}", "fields": { "pabbly_custom_fields": { "{{pabbly_custom_key}}": "{{pabbly_custom_value}}" } } }
Here is what the final action configuration will look like:
Example 2: Custom Fields as an array of JSON objects
JSON:{ "contact": { "email": "[email protected]", "firstName": "John", "lastName": "Doe", "phone": "7223224241", "fieldValues": [ { "field": "1", "value": "The Value for First Field" }, { "field": "6", "value": "2008-01-20" } ] } }
In this case, you can see the "fieldValues" is the array of JSON objects of the custom fields in the request body. So, the request body of the action in Pabbly Connect integration should include the following variables to generate the dynamic custom fields in the frontend.
Note : Using {{pc_skip_field}} as the default value for field settings will skip the specific custom object if no value is provided.JSON:{ "contact": { "email": "{{email}}", "firstName": "{{firstName}}", "lastName": "{{lastName}}", "phone": "{{phone}}", "fieldValues": { "pabbly_custom_fields": [ { "field": "{{pabbly_custom_key}}", "value": "{{pabbly_custom_value}}" } ] } } }
Here is what the final action configuration will look like:
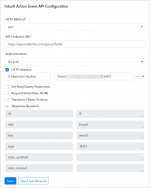
- Create an inbuilt action to list the custom fields under your app integration.
Create an inbuilt action with Dropdown & Custom Fields (Default) type to list the custom fields as shown below:
Note: In the above example, only the first record of the JSON object retrieved from List Custom Fields inbuilt action event is displayed and that will be used to configure the custom fields key and value in the settings. Pabbly Connect automatically processes the other fields on run time.
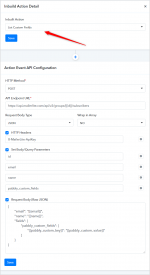
Now, Include and configure the Inbuilt action response in the final action event's pabbly_custom_fields parameter as shown below:
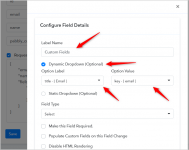
By clicking the setting button below configuration panel will be shown where you can map the pabbly_custom_key and pabbly_custom_value under the Dynamic Dropdown option:
Pabbly Connect process the other fields and the final JSON request with custom fields will look like:
JSON:{ "email": "[email protected]", "name": "John Doe", "fields": { "email": "[email protected]", "name": "John", "last_name": "Doe", "zip": "99901", "mobile_number": "8889888988", "business_address": "912 Park Ave, Ketchikan, Alaska, USA" } }
Frontend view of all the custom fields in the action will be look like:
In this way, you can configure custom fields in your action which will dynamically populate the fields in your app's action at the frontend.
Attachments
Last edited by a moderator: