
This documentation provides a comprehensive, step-by-step guide to understanding the Basic Auth setup process. For example purposes, we have chosen "Razorpay" as our focus application.

Basic Auth lets you connect APIs that authenticate users with a username and password.
 We followed the Razorpay API docs for selecting the Auth type as Basic auth. Learn more

Type - Trigger setup by Instruction.
.png")
Trigger Frontend View:

Action Event API Configuration with JSON Request Body Type -

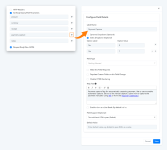
We have set the Payment Capture "Yes" or "No" by the "Static Dropdown" method.

Action Frontend View:

For further details, refer to this guide for creating new actions and triggers in your application. Learn more
Refer to the video below for instructions on creating your app with a similar authentication type: Learn more
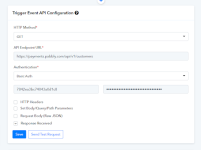
- App Details and Auth Configuration:
Basic Auth lets you connect APIs that authenticate users with a username and password.
- Username Label - Specify your Username field label name e.g. API Key. By default, it is a Username.
- Password Label - Enter your Password field label name here e.g. API Secret Key. By default, it is a Password.
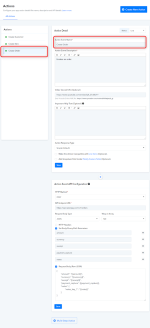
We followed the Razorpay API docs for selecting the Auth type as Basic auth. Learn more- How to Configure Trigger Event:
Type - Trigger setup by Instruction.
Trigger Frontend View:
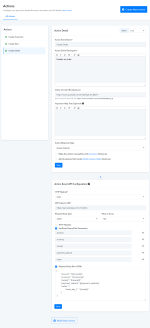
- How to Configure Action Event:
Action Event API Configuration with JSON Request Body Type -
- HTTP request method - POST
- API Endpoint URL - https://api.razorpay.com/v1/orders
- Request Body Type - Specify a request body type to request this action event. By default, it is JSON.
- Wrap in Array - Specify if your request raw JSON needs to be wrapped in an array or not.
- Set Body/Query Parameters - Set parameters if this action event requires passing the query/URL parameters or mapping in request raw JSON e.g. amount, currency.
- Request Body (Raw JSON) - Select this if this action event requires passing the raw JSON data. If used in endpoints then, all variables in it defined under the Set parameters option should have the required option opted. (Some API accepts blank values for JSON keys).
We have set the Payment Capture "Yes" or "No" by the "Static Dropdown" method.Action Frontend View:
For further details, refer to this guide for creating new actions and triggers in your application. Learn more Refer to the video below for instructions on creating your app with a similar authentication type: Learn moreAttachments
Last edited by a moderator: