
AI Code Generator Feature
Introduction
The AI Code Generator is a new feature in Code (Pabbly) that helps users generate JavaScript code using artificial intelligence. This feature is particularly useful for users who want to quickly create code based on natural language descriptions without writing it from scratch.Benefits
- Faster Development: Generate code in seconds instead of writing it manually
- Beginner-Friendly: No need to be an expert coder - describe what you need in plain English
- Error Reduction: AI-generated code follows proper syntax and structure
- Learning Tool: Study the generated code to understand JavaScript patterns
- Customizable: Generated code serves as a starting point that you can modify
Step-by-Step Guide: Using AI Code Generator
Step 1: Access Code (Pabbly) Module
Navigate to your Pabbly Connect workflow and add a Code (Pabbly) action step.Screenshot Reference:
- Search for "code" in the app selector
- Select Code (Pabbly) from the available options
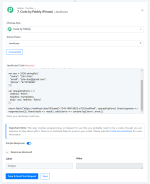
Step 2: Configure the Action
Select Run JavaScript as your App Event.Screenshot Reference:
- Choose "Run JavaScript" from the App Event dropdown
- Click "Connected" to proceed
- You'll see the JavaScript Code field with a sparkle icon (
 ) in the top-right corner
Important Note: The sparkle icon (
) is your gateway to the AI Code Generator feature.Step 3: Open AI Code Generator
Click the sparkle icon () in the JavaScript Code field to open the AI Code Generator modal.Screenshot Reference:
- A modal window titled "AI Code Generator" will appear
- You'll see a text area with the placeholder: "Describe Your Code Requirement"
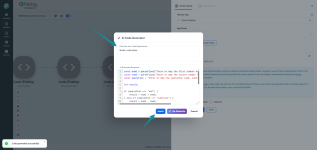
Step 4: Describe Your Code Requirement
Enter a clear description of what you want the code to do in plain English.Screenshot Reference:
- Example: "Build a calculator"
- Click the "Generate" button to create the code
- The AI will process your request and generate JavaScript code
Tips for Better Results:
- Be specific about what you want (e.g., "Calculate total price from array of items")
- Mention input and output formats if needed
- Include any special requirements (e.g., "round to 2 decimal places")
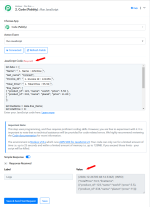
Step 5: Review and Insert Generated Code
Review the AI-generated code and insert it into your workflow.Screenshot Reference:
- The generated code will appear in the modal with line numbers
- Review the code structure and logic
- Three options are available:
- Insert: Add the code to your JavaScript Code field
- Re-Generate: Create a different version if needed
- Cancel: Close without inserting
Once inserted, the code appears in your JavaScript Code field where you can:
- Test it using "Save & Send Test Request"
- Modify it to fit your specific needs
- Map dynamic values from previous workflow steps
Example: Calculator Code Generated by AI
Here's an example of code generated when requesting "Build a calculator":javascript
const num1 = parseFloat("Enter or map the first number here");
const num2 = parseFloat("Enter or map the second number here");
const operation = "Enter or map the operation (add, subtract, multiply, divide) here";
let result;
if (operation === "add") {
result = num1 + num2;
} else if (operation === "subtract") {
result = num1 - num2;
} else if (operation === "multiply") {
result = num1 * num2;
} else if (operation === "divide") {
if (num2 !== 0) {
result = num1 / num2;
} else {
result = "Error: Division by zero";
}
} else {
result = "Error: Invalid operation";
}
return { result: result };
Using the Generated Code with Mapped Fields
After generation, replace the placeholder strings with actual mapped values from previous steps:javascript
const num1 = parseFloat("1. Number 1 : 50");
const num2 = parseFloat("1. Number 2 : 10");
const operation = "1. Operation : multiply";
let result;
if (operation === "add") {
result = num1 + num2;
} else if (operation === "subtract") {
result = num1 - num2;
} else if (operation === "multiply") {
result = num1 * num2;
} else if (operation === "divide") {
if (num2 !== 0) {
result = num1 / num2;
} else {
result = "Error: Division by zero";
}
} else {
result = "Error: Invalid operation";
}
return { result: result };
Best Practices
- Start Simple: Begin with basic requests to understand how the AI interprets your instructions
- Review Generated Code: Always review the code before using it in production workflows
- Test Thoroughly: Use "Save & Send Test Request" to verify the code works as expected
- Customize as Needed: Treat generated code as a starting point - modify it for your specific use case
- Use Re-Generate: If the first generation isn't quite right, use the "Re-Generate" button for alternatives
- Map Dynamic Values: Replace placeholder strings with actual mapped values from your workflow
Common Use Cases for AI Code Generator
- Mathematical Calculations: Build calculators, compute totals, apply formulas
- Data Transformations: Convert data formats, restructure JSON objects
- String Manipulations: Extract, format, or modify text data
- Array Operations: Filter, sort, map, or reduce arrays
- Conditional Logic: Create if-else statements based on conditions
- Date Operations: Format dates, calculate differences, add/subtract time
- Validation Logic: Check data validity, verify formats
- API Response Processing: Parse and transform API responses
Important Reminders
- The AI Code Generator creates JavaScript code (not Python)
- Generated code runs in Node.js v18.x environment
- Standard limitations apply: 25 seconds timeout and 128MB memory limit
- Pre-defined libraries (CryptoJS, Lodash, Moment.js) are still available
- Always test your code before deploying to live workflows
- No technical support is provided for code-related errors
Troubleshooting AI Code Generator
| Problem | Solution |
|---|---|
| Generated code doesn't match requirements | Try rephrasing your description with more specific details |
| Code has syntax errors | Click "Re-Generate" for a new version or manually fix the errors |
| Need different approach | Use "Re-Generate" button to get alternative implementations |
| Code too complex | Break down your requirement into smaller, simpler requests |
| Can't find sparkle icon | Make sure you're in the JavaScript Code field of Code (Pabbly) module |
Note: While the AI Code Generator is a powerful tool, it's designed to assist with code creation - not replace programming knowledge entirely. For complex workflows, understanding basic JavaScript concepts will help you customize and troubleshoot the generated code effectively.
Introduction
You can extend the functionality of your Pabbly Connect workflow by using the most widely used web programming language, JavaScript, with Code by Pabbly : JavaScript action.
Some of use cases include:
- Date transformations or data type conversions.
- Use custom regular expressions to extract data like emails or tracking numbers from large text blobs.
- Make an extra API call to a different service with fetch without building a full dev app.
- Process your data in a way that you think is better than other apps onboard.
- Do your personalized processing or calculations which aren’t currently possible with other apps.
- Perform multiple tasks in a single step.
Warning - This step involves programming, so be careful! To use this, you probably need to be a coder, though you are welcome to play about with it. There is no technical help for errors in your code!
Note: The environment is Node.js v18.x which runs AWS SDK for JavaScript v3. Your code can only run for a limited amount of time i.e. up to 25 seconds and within a limited amount of memory i.e. up to 128MB. If you exceed those limits - your script will be killed.
Section 1.
Variable and function declarations
Inside Code by Pabbly: JavaScript module, you can declare the variables as you do in JavaScript basic programming using `let`, `const`, `var` depending upon your need.
- Entire content you write in or enter into the JavaScript Code field is internally wrapped in an async function, like this:
JavaScript:async function name() { // Predefined constants to use 3 popular libraries. (Ref.: section 7):- const CryptoJS = …; const _ = …; const moment = …; // Pre-declared variable:- var output; // Your code:- ... ... ... ... ... ... return output; } - The wrapper function has some predefined constants, namely CryptoJS, _, and moment and a predefined variable, namely output.
- You can use await keyword if required.
Here is a sample JavaScript code with which, you can get the idea of using variables and performing operations on them to return the desired output.
JavaScript:
//initializing variables
let data = {
 "first_name": "Pabbly", "last_name": "Connect", "invoice_id": 123456, "total_price": 55.50, "line_items": [ { "product_id": 123, "name": "world", "price": 5.50 }, { "product_id": 234, "name": "planet", "price": 11.00 } ] };

let lineItems = data.line_items;
let totalPrice = 0;

//Javascript loop
for (let i = 0; i < lineItems.length; i++) {
  totalPrice += lineItems[i].price;
};

//Output or returning result
return JSON.stringify({"totalPrice":totalPrice});
Check the screenshot below of executing the above code:
- Using the same structure with mapped fields.
JavaScript:
let data = {
   "Name": "1. Name : JohnDoe",
    "last_name": "Connect",
   "Invoice_Id": "1. Invoice Id : 123456",
   "Total_Price": "1. Total Price : 55.50",
    "line_items": [
        { "product_id": 123, "name": "world", "price": 5.50 },
        { "product_id": 234, "name": "planet", "price": 11.00 }
    ]
};

let lineItems = data.line_items;
let totalPrice = 0;

// JavaScript loop
for (let i = 0; i < lineItems.length; i++) {
    totalPrice += lineItems[i].price;
}

// Output or returning result
let result = {
    totalPrice: totalPrice,
    lineItems: lineItems
};

console.log(JSON.stringify(result));
Check the screenshot below of executing the above code:
Section 2.
Return a value: obtain the final output/result of the execution
The returned a value will be available under the label Output in the step Response.
You have two ways to return your required value - using a return statement, using the `output` variable instead of a return statement. Follow any one of them, as demonstrated below.
2.1. Using a return statement:
JavaScript:
// Convert a given paragraph to uppercase and then extract sentences from it:-

var para = 'Code by Pabbly is a freedom to process data in my own way. It allows me to perform multiple tasks in a single step. It supports JavaScript and Python.';

var modification1 = para.toUpperCase();
var modification2 = modification1.replaceAll('. ', '.*');
var sentences = modification2.split('*');

return sentences;
- Using the same structure with mapped fields.
Note: Ensure that the value mapped from the above event adheres to the proper code structure, including clearly defined keys and corresponding values.
2.2. Using the `output` variable instead of a return statement:
Assign your required value to our pre-declared variable `output`. The last assigned value of output will be returned as your execution result.
JavaScript:
// Convert a given paragraph to uppercase and then extract sentences from it:-

var para = 'Code by Pabbly is a freedom to process data in my own way. It allows me to perform multiple tasks in a single step. It supports JavaScript and Python.';

var modification1 = para.toUpperCase();
var modification2 = modification1.replaceAll('. ', '.*');
output = modification2.split('*');
Notice that the outcome (the step Response) is the same.
Section 3.
Logging: printing a variable for testing/debugging
Logging is optional. In order to check (print) intermediate values of the execution, you can use the following console methods:
log(), error(), warn(), and debug().All the printings by these methods will be visible under the label Logs in the step Response.
JavaScript:
// Convert a given paragraph to uppercase and then extract sentences from it:-

var para = 'Code by Pabbly is a freedom to process data in my own way. It allows me to perform multiple tasks in a single step. It supports JavaScript and Python.';

var modification1 = para.toUpperCase();
console.log(modification1);  // logging

var modification2 = modification1.replaceAll('. ', '.*');
var sentences = modification2.split('*');
console.log(JSON.stringify(sentences));  // logging

return sentences;  // the output (result)
Tip:
To print an array or object, stringify it first.
JavaScript:
console.log(JSON.stringify(sentences));- Using the same structure with mapped fields.
Important:
Logging option is not for obtaining the final output of the workflow step. To obtain the final output follow Section 2 above.
Section 4.
Example: Mathematical Expression - divide by five
JavaScript:
let num = 125;
return {
  result: Number(num)/5
};- Using the same structure with mapped fields.
Section 5.
Example: Using Regex to extract emails from given string
JavaScript:
let string = "Here are the emails [email protected], [email protected] and [email protected]";
return {
  Emails: (string.match(/([\w._-]+@[\w._-]+\.[\w._-]+)/gi) || [])[0]
};- Using the same structure with mapped fields.
Section 6.
Example: Use fetch()
The Fetch API provides a JavaScript interface for accessing and manipulating parts of the protocol, such as requests and responses. It also provides a global fetch() method that provides an easy, logical way to fetch resources asynchronously across the network.
GET API Call Example
JavaScript:
//Defining headers
var myHeaders = new Headers();

//Initializing header with required values like, API Key, Content type etc.
myHeaders.append("X-API-Key", "HE48Q2LUVB6OXXXXXX5BARMGUSHS");
myHeaders.append("X-Account-Name", "MyAccount");

var requestOptions = {
method: 'GET',
headers: myHeaders,
redirect: 'follow'
};

//Return statement with fetch function
return fetch("https://api.newzenler.com/api/v1/users?limit=1&search=john.doe@gmail",
requestOptions) .then(response => response.json()) .then(result => result.data) .catch(error => console.log('error', error));
POST API Call Example
JavaScript:
//Defining headers
var myHeaders = new Headers();

//Pass specific headers if required like, API Key, Token, Content Type etc..
myHeaders.append("x-api-key", "XLgggHyhde887887");
myHeaders.append("Content-Type", "application/json");

//API request body JSON payload
var raw = JSON.stringify({
"name": "John Doe",
"email": "[email protected]",
"phone": "877878898"
});

var requestOptions = {
method: 'POST',
headers: myHeaders,
body: raw, redirect: 'follow'
};

//Return statement with fetch function
return fetch("https://webhook.site/059ceed3-7545-4f8f-9852-e7023ce6f4a9", requestOptions) .then(response => response.text()) .then(result => result) .catch(error => console.log('error', error));
Section 7.
Available JavaScript libraries
The module has been reinforced with three popular JavaScript libraries, namely CryptoJS, Lodash, and Moment. These libraries are ready to access through our pre-defined identifiers
CryptoJS, _, and moment respectively.7.1 CryptoJS
CryptoJS is a growing collection of standard and secure cryptographic algorithms like, MDF, SHA1, SHA2, AES, HMAC, etc. implemented in JavaScript using best practices and patterns.
JavaScript:
//initialize varaibales
var public_api_key = "7e151e4060d6497111ed15565351b4332";
var secret_key = "8ad52a1d5d619835566a3848f3a6edg";

//Getting current timestamp
var timestamp = Math.floor(new Date().valueOf()/1000);

//Calculating hash HMAC using CryptoJs
var hash = CryptoJS.HmacSHA1(public_api_key + timestamp, secret_key);

//Returning the output
return {
"public_api_key":public_api_key, "timestamp":timestamp, "hash":hash.toString()
};
- Using the same structure with mapped fields.
7.2. Moment.js
A JavaScript date library for parsing, validating, manipulating, and formatting dates.
JavaScript:
let now = moment().format('LLLL');
let locale = moment.locale();
let format = moment("10/08/2022").format("MM-DD-YYYY");
let day = moment("2022-10-08").format("dd");

output = {
"now":now,
"locale":locale,
"format":format,
"day":day
};
- Using the same structure with mapped fields.
7.3 Lodash
Lodash is a JavaScript library that works on the top of underscore.js. It helps in working with arrays, strings, objects, numbers, etc. It provides us with various inbuilt functions and uses a functional programming approach which that coding in JavaScript easier to understand because instead of writing repetitive functions, tasks can be accomplished with a single line of code.
JavaScript:
var users = [
{ 'user': 'barney', 'age': 36, 'active': true },
{ 'user': 'fred', 'age': 40, 'active': false }
];

// the `_.matches` iteratee shorthand.
return _.filter(users, { 'age': 36, 'active': true });
- Using the same structure with mapped fields.
Troubleshooting
Problem | Possible Cause | Solution |
|---|---|---|
In automation my Code step shows Error: SyntaxError: Invalid or unexpected token. If I copy the sent code from the Task History ('Data In' tab), and paste it into a Code input field, it runs fine. | The data you pass to Code contains: HTML tags and/or line breaks within strings wrapped with "" or ''. | Before using in Code, sanitize your data with the following actions.
`` wrapped strings won't break the syntax.
Code:
Note: line breaks in `` wrapped strings won't break the syntax in JSON.
Code:
|
| My Code step shows Logs, but not the output. | Missing a return or output statement in right place. | You have two ways to obtain (return) your required value. If you want to obtain the value of x, write any one of the following statements:
See demos in Section 2 of this guide. |
| My Code works sometimes, but sometimes doesn't. |
| |
For a detailed explanation of how to use Code (Pabbly), please refer to the video below:
Attachments


Last edited by a moderator: