The Pabbly Chatflow Flow Builder enables you to create static chatbots effortlessly using an intuitive drag-and-drop interface. This guide will walk you through the process of building a chatbot in just 10 minutes.


Example: If a user enters "Bhopal" as their city and the condition is set to "Bhopal," the chatbot will return a "True" response. Otherwise, it will return "False."

Example: If a user submits their PAN card details, they receive a "True" response. If no details are provided, they receive a "False" response.

Example: A chatbot can be programmed to send a welcome message between 10 AM and 7 PM. Messages received outside these hours can trigger an off-hour response. Similarly, date-based conditioning can be used for holidays and vacations.

2. Ask Address
This node enables the chatbot to collect the user’s address. The chatbot prompts the user to enter their complete address, which can then be stored for future interactions, deliveries, or support queries.
Example: If a business requires shipping details, the chatbot can request the address and store it for processing orders or deliveries.

Example: If a service provider wants to allocate a technician for a home service, the chatbot can collect the customer’s location to assign the nearest available technician.

Example: A chatbot for an online event may ask users for their full name and email address to send them a confirmation link.

Example: A banking chatbot may ask users to upload a scanned copy of their identity proof for verification purposes.
Example:

For a detailed walkthrough, watch the tutorial: API Integration Tutorial


9. Assign AI Assistant
The Assign AI Assistant node allows you to assign an AI assistant to a specific chat flow, enabling automated responses and task management.
10. Single AI Message:
The "Single AI Message" node in Pabbly Chatflow is designed to send a one-time message from an AI assistant during a chatbot flow. It allows you to provide a response based on the selected AI assistant.
How to Use:


1. Login to your Pabbly Chatflow account.
2. Navigate to the left sidebar and select "Flows" to create a chatbot.

3. Click on "Add Flow" to initiate chatbot creation.

4. Upon clicking "Add," you will see a Flow Start Node. Here, you can choose how to trigger the chatbot flow using one of the three methods:

5. After selecting the flow start option, drag and drop the required message type or action nodes according to your business requirements.
Types of Messages You Can Create Using the Flow Builder
1. Text Replies
Text replies allow you to send simple messages to users. You can also incorporate buttons and additional message types by adding context.2. Media Button
This node enables the inclusion of images, videos, audio, and documents. You can either upload files via drag-and-drop or provide a URL. Captions and buttons can also be added to enhance interactivity.3. List Messages
Use list messages to offer users multiple options to choose from. This feature is particularly effective for displaying a set of predefined choices.4. Template Messages
Chatbots can be programmed to trigger pre-approved template messages based on specific keywords sent by users. Note that templates must be created in the Template Module before being used in the flow.Action Nodes Available in Pabbly Chatflow
1. Condition Node
Equal If-Else Condition
This condition verifies if the user input matches a predefined value. If the value matches, a "True" response is sent; otherwise, a "False" response is delivered.Example: If a user enters "Bhopal" as their city and the condition is set to "Bhopal," the chatbot will return a "True" response. Otherwise, it will return "False."
Exists If-Else Condition
This condition checks whether a user has provided any input. If a value exists, a "True" message is sent; otherwise, a "False" message is returned.Example: If a user submits their PAN card details, they receive a "True" response. If no details are provided, they receive a "False" response.
Time-Based and Date-Based Conditioning
This feature allows chatbots to provide customized responses based on specific time ranges.Example: A chatbot can be programmed to send a welcome message between 10 AM and 7 PM. Messages received outside these hours can trigger an off-hour response. Similarly, date-based conditioning can be used for holidays and vacations.
2. Ask Address
This node enables the chatbot to collect the user’s address. The chatbot prompts the user to enter their complete address, which can then be stored for future interactions, deliveries, or support queries.
Example: If a business requires shipping details, the chatbot can request the address and store it for processing orders or deliveries.
3. Ask Location
The chatbot can request the user’s live location to facilitate location-based services. The user will be prompted to share their current GPS location using WhatsApp’s built-in location-sharing feature.Example: If a service provider wants to allocate a technician for a home service, the chatbot can collect the customer’s location to assign the nearest available technician.
4. Ask a Question
This feature allows the chatbot to collect structured information from users, such as their name, email, phone number, or any other relevant details. You can define specific input fields to ensure accurate data collection.Example: A chatbot for an online event may ask users for their full name and email address to send them a confirmation link.
5. Ask Media
This node enables users to upload and share media files such as images, videos, documents, or audio clips. The chatbot can collect media for verification purposes, customer support, or documentation.Example: A banking chatbot may ask users to upload a scanned copy of their identity proof for verification purposes.
6. Set Custom Field & Tag
This feature captures user responses as attributes and assigns values accordingly. Users can also be categorized using tags.Example:
- If a chatbot presents two quick reply buttons, "Show Offers" and "Not Interested," the chatbot assigns the "Optin" attribute to both.
- Clicking "Show Offers" assigns the "Optin" attribute with a "Yes" value, while "Not Interested" assigns it a "No" value.
- These responses can then be used for lead segmentation and further communication.
7. API Request
The chatbot can integrate with external systems via API calls to fetch and send data dynamically. This ensures a personalized and efficient user experience.For a detailed walkthrough, watch the tutorial: API Integration Tutorial
8. Connect Flow
Pre-existing chatbot flows can be linked together to streamline development and save time. This feature enhances efficiency and ensures modular chatbot design.9. Assign AI Assistant
The Assign AI Assistant node allows you to assign an AI assistant to a specific chat flow, enabling automated responses and task management.
How to Use:
- Select AI Assistant: Choose the AI assistant you have already created inside the AI Assistant module. This AI assistant will be assigned to the chat once the flow is triggered.
- Start With: The flow allows you to start the conversation in different modes:
- Start Without Message: This triggers the AI assistant without sending an initial message.
- Use Client Message: The AI assistant will respond to the text message from the previous node in the flow.
- Welcome Message: Sends a static message directly to the client, bypassing the AI assistant for the first time.
- Personalized Message: Your message will be sent to the AI assistant, and its generated response will be sent to the client.
10. Single AI Message:
The "Single AI Message" node in Pabbly Chatflow is designed to send a one-time message from an AI assistant during a chatbot flow. It allows you to provide a response based on the selected AI assistant.
How to Use:
- Select AI Assistant: Choose the pre-configured AI assistant to send the response.
- Response Behavior: The AI assistant will send a single response to the user.
- Store in Custom Field: Optionally, use the "Select Contact Custom Field" to save the AI assistant's response for future use, segmentation, or automation.
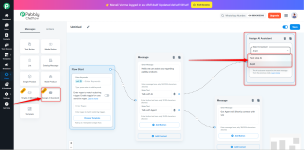
How to Create a WhatsApp Chatbot Using Flow Builder?
Creating a chatbot using Flow Builder is extremely easy. All you need to do is choose the necessary elements (like Lists or Media Buttons) and drag & drop them onto the builder.Step-by-Step Guide
1. Login to your Pabbly Chatflow account.
2. Navigate to the left sidebar and select "Flows" to create a chatbot.
3. Click on "Add Flow" to initiate chatbot creation.
4. Upon clicking "Add," you will see a Flow Start Node. Here, you can choose how to trigger the chatbot flow using one of the three methods:
- Using Keyword: The chatbot flow triggers when the predefined keyword is received in a message.
- Using Regex (Regular Expression): This method allows for more advanced message pattern recognition. The flow gets triggered when the user message matches the regex pattern. (Requires technical knowledge for regex creation). Learn more
- Using Choose Template: Only approved WhatsApp message templates with quick replies (previously created in the template module) will be listed. Selecting one will trigger the flow when the template is used.
5. After selecting the flow start option, drag and drop the required message type or action nodes according to your business requirements.
Finalizing Your Flow
Once the flow is built according to your needs, follow these steps:- On the top of the Flow Builder screen, you will see an option to name your flow.
- On the right corner, you can enable the toggle to make your flow active.
- Click on the Save button to save your created flow.
Learn More
To know more, you can watch our video tutorial here: How to Create a Drag & Drop ChatbotConclusion
With Pabbly Chatflow's intuitive Drag & Drop Flow Builder, creating chatbots has never been easier. By leveraging powerful message nodes, action nodes, and seamless integrations, you can automate conversations, provide prompt customer support, and drive sales efficiently. Start building your chatbot today and enhance your business communication like never before!Attachments
Last edited by a moderator: