This documentation provides a detailed, step-by-step guide for integrating your Facebook Pages account with Pabbly Connect. Following these instructions will enable you to establish a seamless connection between the two platforms.
How to authorize Facebook Pages in Pabbly Connect?
1. Select "Facebook Pages" Trigger/Action:
Within Pabbly Connect, navigate to the action step and choose "Facebook Pages" as the application then in the action event select the event you wish to perform, such as "Upload Reel".

2. Configure the Connection:
To establish a connection, select "Add New Connection" and log in to your Facebook pages account. If you already have an existing connection, you can opt for "Select Existing Connection" instead.

========================== Actions ================================
How to Set Up and Publish a Reel on Facebook Pages Using Pabbly Connect:
Within Pabbly Connect, navigate to the Action step and follow these processes:
Step 1. Upload Reel by URL


Note: Video Specifications
Property | Specification
Successful Integration:
Upon completing the above steps, your Facebook Page account will now be successfully integrated with Pabbly Connect. You can utilize different actions and triggers according to your purpose. With this integration, you can automate processes through Pabbly Connect, improving your workflow and enhancing your productivity.
If you encounter any issues or require further assistance, feel free to reach out to our support team for help. ([email protected])
Happy integrating!
How to authorize Facebook Pages in Pabbly Connect?
- Sign in to the Facebook account using your Facebook credentials.
- Within Pabbly Connect established a connection between Facebook Pages and Pabbly Connect.
1. Select "Facebook Pages" Trigger/Action:
Within Pabbly Connect, navigate to the action step and choose "Facebook Pages" as the application then in the action event select the event you wish to perform, such as "Upload Reel".
2. Configure the Connection:
To establish a connection, select "Add New Connection" and log in to your Facebook pages account. If you already have an existing connection, you can opt for "Select Existing Connection" instead.
========================== Actions ================================
How to Set Up and Publish a Reel on Facebook Pages Using Pabbly Connect:
Within Pabbly Connect, navigate to the Action step and follow these processes:
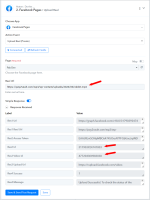
Step 1. Upload Reel by URL
- Facebook Pages: Upload Reel
- Description: This action involves uploading the reel to Facebook Pages using a provided URL.
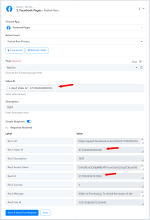
- Facebook Pages: Publish Reel
- Description: Once the reel is uploaded, this action is responsible for publishing the reel on Facebook Pages.
- Facebook Pages: Get Upload Status
- Description: This action checks the upload status to ensure the video has been successfully uploaded.
Note: Video Specifications
Property | Specification
- Rate Limit
The Reels API is limited to 30 API-published posts within a 24-hour moving period.
- File Type-
.mp4 (recommended)
- Aspect Ratio-
9 x 16
- Resolution
1080 x 1920 pixels (recommended)
Minimum: 540 x 960 pixels
- Frame Rate
24 to 60 frames per second
- Duration
3 to 90 seconds
A reel published as a story on a Facebook Page cannot exceed 60 seconds
- Video Settings
Chroma subsampling: 4:2:0
Closed GOP: 2-5 seconds
Compression: H.264, H.265 (VP9, AV1 are also supported)
Fixed frame rate
Progressive scan
- Audio Settings
Audio bitrate: 128 kbps+
Channels: Stereo
Codec: AAC Low Complexity
Sample rate: 48 kHz
Successful Integration:
Upon completing the above steps, your Facebook Page account will now be successfully integrated with Pabbly Connect. You can utilize different actions and triggers according to your purpose. With this integration, you can automate processes through Pabbly Connect, improving your workflow and enhancing your productivity.
If you encounter any issues or require further assistance, feel free to reach out to our support team for help. ([email protected])
Happy integrating!
Attachments
Last edited:


