The AI Assistant in Pabbly Chatflow helps you automate and enhance your customer support and engagement by leveraging artificial intelligence. The AI Assistant can interact with customers, answer queries and provide support — all without manual intervention.
How to Set Up the AI Assistant in Pabbly Chatflow


Upload Knowledge Base File

Connect Knowledge Source

Once you have configured the AI Assistant, you can utilize it to automatically handle WhatsApp chats in the Inbox page. This is how you can assign a conversation to the AI Assistant:

This section helps in managing and organizing chats efficiently for seamless workflow management.
How to Set Up the AI Assistant in Pabbly Chatflow
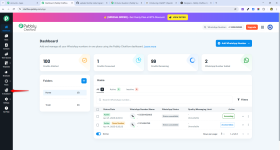
Step 1: Log in to Your Pabbly Chatflow Account
Access your Pabbly Chatflow dashboard by signing in with your credentials.Step 2: Navigate to AI Assistant
- In the navigation panel, click on AI Assistant.
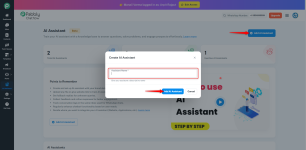
Step 2: Add a New AI Assistant
- Click on the + Add AI Assistant button.
- A pop-up window will appear prompting you to enter the Assistant Name.
- Enter a Descriptive Name for your AI Assistant (e.g., “Customer Support Bot” or “Product Inquiry Bot”).
- Click Add AI Assistant to create the new assistant.
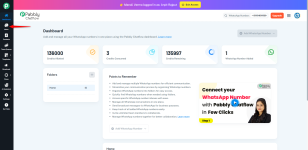
Step 3: When You Click on Add AI Assistant
After clicking on Add AI Assistant, the following interface will appear:Step 4: Configure AI Instructions
Once you’ve added your AI Assistant, you’ll be directed to the configuration page where you can customize its behavior:- Select Instruction Type
- Choose from Custom Prompt or Examples.
- Examples include pre-configured roles like:
- AI Agent
- Customer Support Agent
- Sales Agent
- Language Tutor
- Coding Expert
- Life Coach
- Futuristic Fashion Advisor
- Enter Instructions
- Provide detailed instructions for your AI Assistant on how to respond to queries. Include information on the assistant’s purpose, tone, and behavior.
- Provide detailed instructions for your AI Assistant on how to respond to queries. Include information on the assistant’s purpose, tone, and behavior.
- Set Temperature
- Set the Temperature between 0 to 1. A temperature of 0 makes responses more precise, while 1 allows for more creative and diverse answers.
- Set the Temperature between 0 to 1. A temperature of 0 makes responses more precise, while 1 allows for more creative and diverse answers.
- Select AI to Use
- Choose the AI platform you want to use for your assistant, such as OpenAI.
- Choose the AI platform you want to use for your assistant, such as OpenAI.
- Select Model
- Choose the appropriate AI model:
- GPT-4.1
- GPT-4 Mini
- GPT-4
- GPT-3
- GPT-3.5 Turbo
- Choose the appropriate AI model:
- API Token (OpenAI)
- OpenAI API Key:
OpenAI uses API Keysfor authentication.- Step 1: Visit the OpenAI API Keys page and copy your API key.
- Step 2: Paste the API token into the API Token field in Pabbly Chatflow.
- Step 3: Click the Connect button to link the API token and establish the connection.
- OpenAI API Key:
Upload Knowledge Base File
- In this step, you can upload any relevant documents or resources that will help the AI Assistant answer customer queries effectively. This could include company FAQs, product descriptions, or customer service guidelines.
- Click to upload:
To upload your knowledge file, click the "Choose a file or drag it here" area. This will allow you to upload any relevant text or document files. - Upload a file that can be used across various endpoints. Individual files can be up to 512 MB, and the size of all files uploaded by one organization can be up to 100 GB.
Connect Knowledge Source
- After uploading, the knowledge sources will be available to the AI Assistant for answering customer queries. You can update and refine this knowledge base as needed to ensure the assistant remains accurate and up-to-date.
Assistant Interface Configuration
- Header Display Heading Name
- Enter the brand name or header title you want your assistant to display in the chat interface. For example, “Your Brand Name”.
- Header Display Subheading Name
- You can add a subheading to greet your users. For example, “We’re online and happy to assist you!”
- Initial Messages
- Set the initial message that the AI assistant will send when a customer starts the chat. For example, “Hi there! How can I help you today?”
- Display the “Powered by Pabbly” label
- You can choose to display or hide the “Powered by Pabbly” label in the chat interface.
- Footer Text
- Add footer text such as a Privacy Policy or other disclaimers. This text can also be a clickable link.
- User First Message
- Set the first message that the assistant will ask the user when they initiate the conversation. For example, “I need help.”
- Footer Link
- Provide a link, such as a privacy policy or terms of service. This can be clickable in the footer.
- Fallback Message
Add a Fallback Messagefor situations where the AI is unable to respond. This message will appear when the assistant does not know how to answer a question. Example:- "I'm here to assist with questions related to company information or support. If you have any questions about our services or need assistance with something specific, feel free to ask!"
Step 6: Start Chat Button
- Start Chat Button
- The Start Chat button allows users to initiate a conversation with the AI assistant. Once users click it, the conversation will start right away.
- It's prominently displayed for easy access.
Step 7: Enable the Scan QR Button
- Scan QR Button
- When you click on the Scan QR button, users will have the option to scan a QR code and initiate a conversation with your AI assistant or your WhatsApp number.
- It can be useful for initiating conversations from different devices or locations.
- When you click on the Scan QR button, users will have the option to scan a QR code and initiate a conversation with your AI assistant or your WhatsApp number.
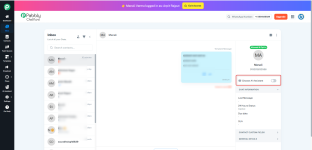
Once you have configured the AI Assistant, you can utilize it to automatically handle WhatsApp chats in the Inbox page. This is how you can assign a conversation to the AI Assistant:
- Navigate to Inbox Page
- Go to the Inbox module in Pabbly Chatflow, where all your customer chats are listed.
- Go to the Inbox module in Pabbly Chatflow, where all your customer chats are listed.
- Enable AI Assistant Toggle
- In the chat window, you’ll see a toggle option labeled "Choose AI Assistant."
- When this toggle is enabled, you can assign the current conversation to the AI Assistant instead of a team member.
- In the chat window, you’ll see a toggle option labeled "Choose AI Assistant."
- Select the AI Assistant You Created
- After toggling the AI Assistant switch on, you'll be able to choose the AI Assistant you created from a dropdown list.
- Select the AI Assistant you want to assign to the chat
- AI Handles the Chat
- Once the AI Assistant is chosen, it will start interacting with the customer based on the configured instructions and fallback messages.
- The AI Assistant will automatically respond to customer queries and manage the conversation flow without needing human intervention.
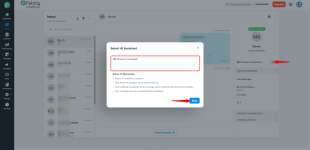
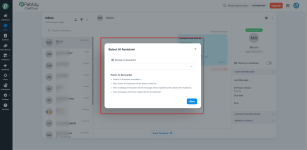
Step 8: Stopping the AI Assistant or Assigning Chat to a Team Member
Once the AI Assistant has started handling a chat, you might want to stop it or assign the conversation to another team member. Here’s how to manage that:- Stop the AI Assistant
- If you want to stop the AI Assistant from handling the chat, simply click on the "Stop AI Assistant" button located in the Chat Information panel.
- If you want to stop the AI Assistant from handling the chat, simply click on the "Stop AI Assistant" button located in the Chat Information panel.
- Select the Status
- After clicking Stop AI Assistant, a popup will appear. Here, you can select the status for the chat (e.g., Open, Replied, Pending, etc.).
- After clicking Stop AI Assistant, a popup will appear. Here, you can select the status for the chat (e.g., Open, Replied, Pending, etc.).
- Save the Changes
- Once you've chosen the appropriate status, click Save to update the chat's status and stop the AI Assistant from responding.
- Once you've chosen the appropriate status, click Save to update the chat's status and stop the AI Assistant from responding.
- Assign to a Team Member
- If you wish to assign the chat to a specific team member, you can do so manually after stopping the AI Assistant. Select the team member from the available options and manually assign the chat to them.
- If you wish to assign the chat to a specific team member, you can do so manually after stopping the AI Assistant. Select the team member from the available options and manually assign the chat to them.
Step 9: AI Assistant Status in Team Queues
In the Team Queues section, you can view the status of assigned chats. Whether a chat has been assigned to the AI Assistant or a team member, it will be displayed under the corresponding section.- Assigned to AI Assistant: Chats that are being handled by the AI Assistant are shown under the AI Assistantsection.
- You will see the status of these chats, such as Template Message or other status indicators.
- Assigned to Team Member: Similarly, chats assigned to specific team members will appear under the Team List, showing the name of the team member and the assigned chat status.
- Move existing assigned chats to different categories.
- Reassign chats if needed, either to the AI Assistant or another team member.
This section helps in managing and organizing chats efficiently for seamless workflow management.
Benefits of Using AI Assistant for Chat Assignment
- Instant Response: The AI Assistant can respond to customer messages instantly, ensuring that users don't have to wait for a team member.
- Efficient Workload Management: By assigning chats to the AI, your team can focus on more complex queries while the assistant handles repetitive ones.
- 24/7 Availability: The AI Assistant ensures your business can engage with customers at any time, even outside of working hours.
Attachments
Last edited: