Chat Rules in Pabbly Chatflow help you control how customer chats are managed. Inside the Chat Rules module, you’ll find two main sections: Chat Assignment Rules and Chat Status Rules.
Follow these steps to configure Chat Assignment Rules and Chat Status Rules inside your Chat Rules settings to streamline and automate customer conversations.
This ensures fair and even workload distribution without needing manual intervention.


2. You will see a table with the following columns:

3. You can add multiple rules to manage different scenarios. For example:

4. Click Add More Rules to set additional conditions.

5. Once all rules are defined, click Save to activate them.

These rules help automate chat handling by ensuring chats don't get stuck in one status for too long, keeping your workflows efficient and responsive.
Important Note : You cannot set a status update to AI Assistant through Chat Status Rules.
While you can manually assign the AI Assistant status from the inbox, it cannot be set automatically using status rules.
- Chat Assignment Rules let you automatically or manually assign incoming chats to team members to ensure fair workload distribution.
- Chat Status Rules allow you to automatically update the status of a chat after a specific number of days to keep conversations moving forward.
Follow these steps to configure Chat Assignment Rules and Chat Status Rules inside your Chat Rules settings to streamline and automate customer conversations.
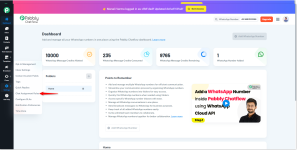
Step 1: Log in to Your Pabbly Chatflow Account
Access your Pabbly Chatflow dashboard by signing in with your credentials.Step 2: Navigate to Chat Assignment Rules
- Go to the Settings module.
- In the navigation panel, click on Chat Rules
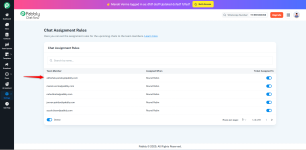
Step 3: Chat Assignment Rules
Chat Assignment Rules help you assign incoming chats to the right team members — either automatically (Round Robin) or manually. This prevents delays and balances workload across your team.Adding a Team Member
Before assigning chats, ensure that the required team members are added to your account.Automatic Chat Distribution (If No Manual Assignment)
If you do not manually assign a chat, the system will automatically distribute incoming chats among available team members based on the Round Robin method.This ensures fair and even workload distribution without needing manual intervention.
Assigning Chats from General Settings
From the Inbox :- Select the chat(s) you want to assign.
- Assign them to the relevant team member.
From General Settings: - Navigate to General Settings.
- Under Chat Owner, select the team member you wish to assign the chat to.
Important Notes:
- The Chat Owner setting assigns ownership to a specific teammate for all new chats.
- If Round Robin is enabled (by assigning to a team in Chat Assignment Rules), chats will be distributed automatically among available agents.
- You can change the Chat Owner anytime based on team availability or workload.
Step 4: Chat Status Rules
Chat Status Rules let you automatically change the status of a chat based on how long it has remained in a particular state.What It Does
- Automatically changes the chat status based on how long it has been in the current state.
- Keeps your chat pipeline clean and updated.
How to Configure:
1. Scroll to Chat Status Rules Section:- Below the Chat Assignment Rules, find the Chat Status Rules section.
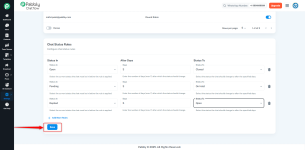
2. You will see a table with the following columns:
- Status In: Select the current chat status to apply the rule (e.g., AI Assistant, Pending, On Hold).
- After Days: Enter the number of days (maximum 7) after which the status should automatically change.
- Status To: Choose the new status that should be applied once the number of days has passed.
3. You can add multiple rules to manage different scenarios. For example:
- If a chat is in “Pending” for 4 days, it can automatically move to “Replied.”
- If a chat is “Open” and no action is taken for 3 days, it can be marked as “Replied.”
4. Click Add More Rules to set additional conditions.
5. Once all rules are defined, click Save to activate them.
These rules help automate chat handling by ensuring chats don't get stuck in one status for too long, keeping your workflows efficient and responsive.
Important Note :
You cannot set a status update to AI Assistant through Chat Status Rules.While you can manually assign the AI Assistant status from the inbox, it cannot be set automatically using status rules.
Attachments
Last edited: