Step 1. Create a Chatflow Account
Before integrating with Meta, ensure you have a Pabbly Chat Flow account. If you haven't created one, sign up and set up your account.
Step 2. Visit the Facebook Developers Page
- Open Facebook Developers.
- Log in to your Facebook account.
- Navigate to the My Apps section to see a list of apps linked to your Facebook account.
- If no apps are displayed, you need to create one.
Step 3. Create a Facebook Developer App
- Click on Create App.
- A dialog box will appear where you need to provide:
- App Name
- App Contact Email (By default, it will be your Facebook account email, but you can change it.)
- Click on Next.
Step 4. Choose App Use Case
- The next screen will ask for the purpose of creating the app.
- Select Other and click Next.
Step 5. Select App Type
- Choose Business (since WhatsApp is categorized under Business apps).
- Click Next.
Step 6. Provide Business Details
- A new dialog box will appear asking for:
- App Name
- App Contact Email
- Business Portfolio (optional, but required for full app functionality)
Step 6.1. Create a Business Portfolio (if not available)
- Visit business.facebook.com.
- In the left sidebar, find the Business Portfolio section.
- Click on Create Business Portfolio.
- Fill in the required details:
- Business Portfolio Name
- First Name & Surname
- Business Email Address
- Click Create.
- Once created, link this business portfolio to your Meta Developer app.
- Click Create App, confirm with your Facebook password, and submit.
Step 7. Configure the App for WhatsApp
- The app is now created but in development mode.
- Select WhatsApp as the social media account to integrate.
- If using WhatsApp Cloud API:
- Select your Business Portfolio and click Continue.
- Select your Business Portfolio and click Continue.
Step 8. Generate API Token
- Click Start Using API.
- Generate an API token for the given test number.
- If you want to add your own WhatsApp number, you must link it with a WhatsApp Cloud API account.
- Ensure the number does not have an existing active WhatsApp account as per Meta's policy.
Step 9. Add a Phone Number
- Click Add Phone Number.
- A dialog box will appear asking for:
- Business Name
- Business Website or Profile Page
- Country
- Fill in the details and click Next.
Step 10. Complete WhatsApp Business Profile Setup
- Add WhatsApp Business Profile details:
- Business Name
- Timezone
- Category
- Business Description
- Click Next.
Step 11. Finalize Phone Number Addition
- A verification code will be sent to your phone number.
- Once verified, the number will be added to your WhatsApp Cloud API account.
Step 12. Add Payment Method
- Before making the app live, add a payment method.
- Provide necessary business details like GST number (for Indian users).
Step 13. Enable Live Mode
- Change the app status to Live to complete the integration.
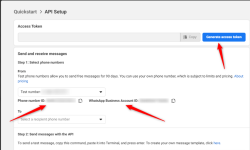
Step 14. Generate an Access Token
Generate a Temporary Access Token (Only for Testing purposes)
- Generate an access token (a temporary token that expires in an hour).
- Add the following details to Pabbly Chat Flow in the Add WhatsApp Number dialog box:
- Access Token
- Phone Number ID
- WhatsApp Business Account ID
Generate a Permanent Access Token
- Go to the Configuration section.
- Scroll down to the Permanent Token section.
- Click the provided link to Meta’s documentation on generating a permanent token.
- Follow the steps to generate a System User Access Token:
- Go to Business Settings.
- Click System Users.
- Click +Add, enter a System User Name, and assign an Admin or Employee role.
- Select the created system user and assign the necessary assets and permissions:
- business_management
- whatsapp_business_management
- Click Generate Token, choose the app, set token expiration to Never, and copy the token.
- Add this permanent token to the Add WhatsApp Number dialog box in Pabbly Chat Flow.
Step 15. Configure Webhook in Meta Developer
- Copy the Webhook Callback URL and Webhook Token from Pabbly Chat Flow.
- In Meta Developer, go to Configuration and paste these details.
- Enable webhook fields to complete the setup.
Conclusion
Your Meta Developer app is now integrated with WhatsApp Cloud API, and your WhatsApp number has been added to the Pabbly Chat Flow account successfully.Reference Video: Watch the YouTube Tutorial
Attachments
Last edited: