This document provides step-by-step instructions on how to pass UTM parameters from the URL to the Pabbly Subscription Billing checkout page on your WordPress website using Elementor.
Step 1: Add a Form on to website
If your website does not have a form, follow these steps to add one using Elementor:

Step 2: Create UTM Fields in the Form
To capture and store UTM parameter values from the URL, create same UTM fields in the form:
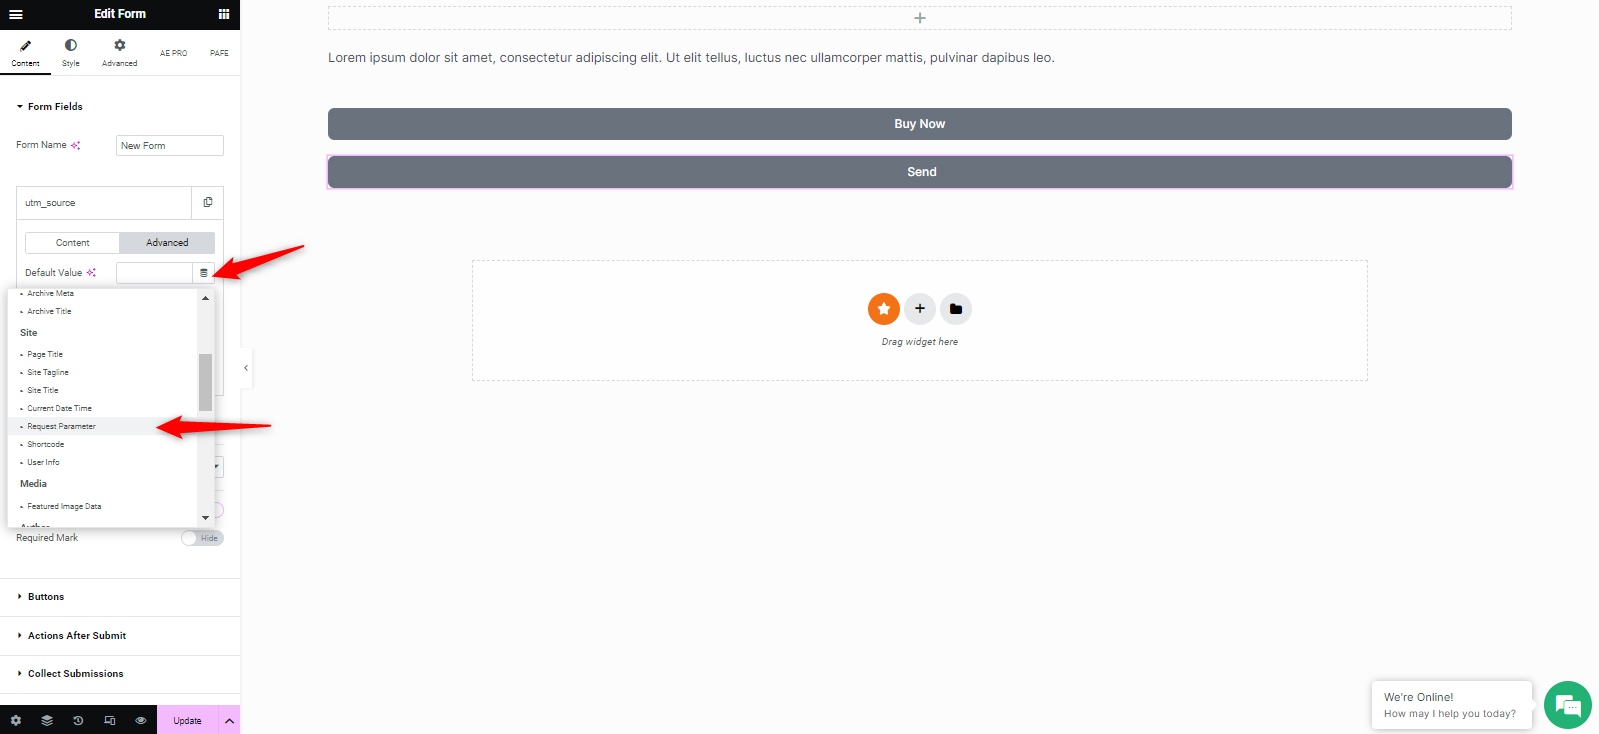
Under Advanced Options, set the Default Value to "Site - Request Parameter."
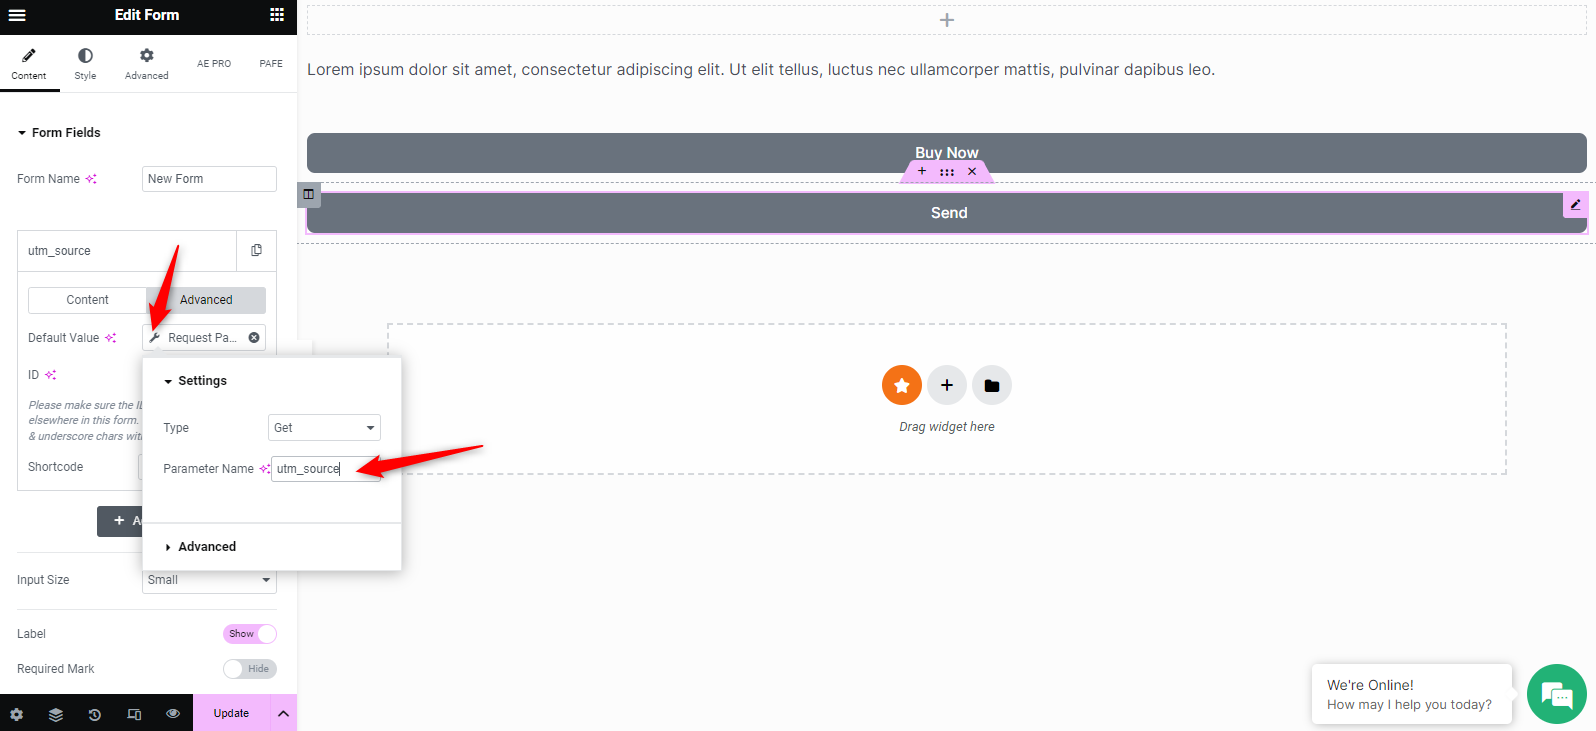
Select the field again or tap on the gear icon to set the Request Parameter option. Choose "GET" for the type and enter the UTM field name (e.g., utm_source) in the Parameter Name.
Example:
In Content
Copy the Shortcode(unique ID) generated for each field; you will use this ID for prefilling the checkout page.
Step 3: Set Button Submission Action to Redirect
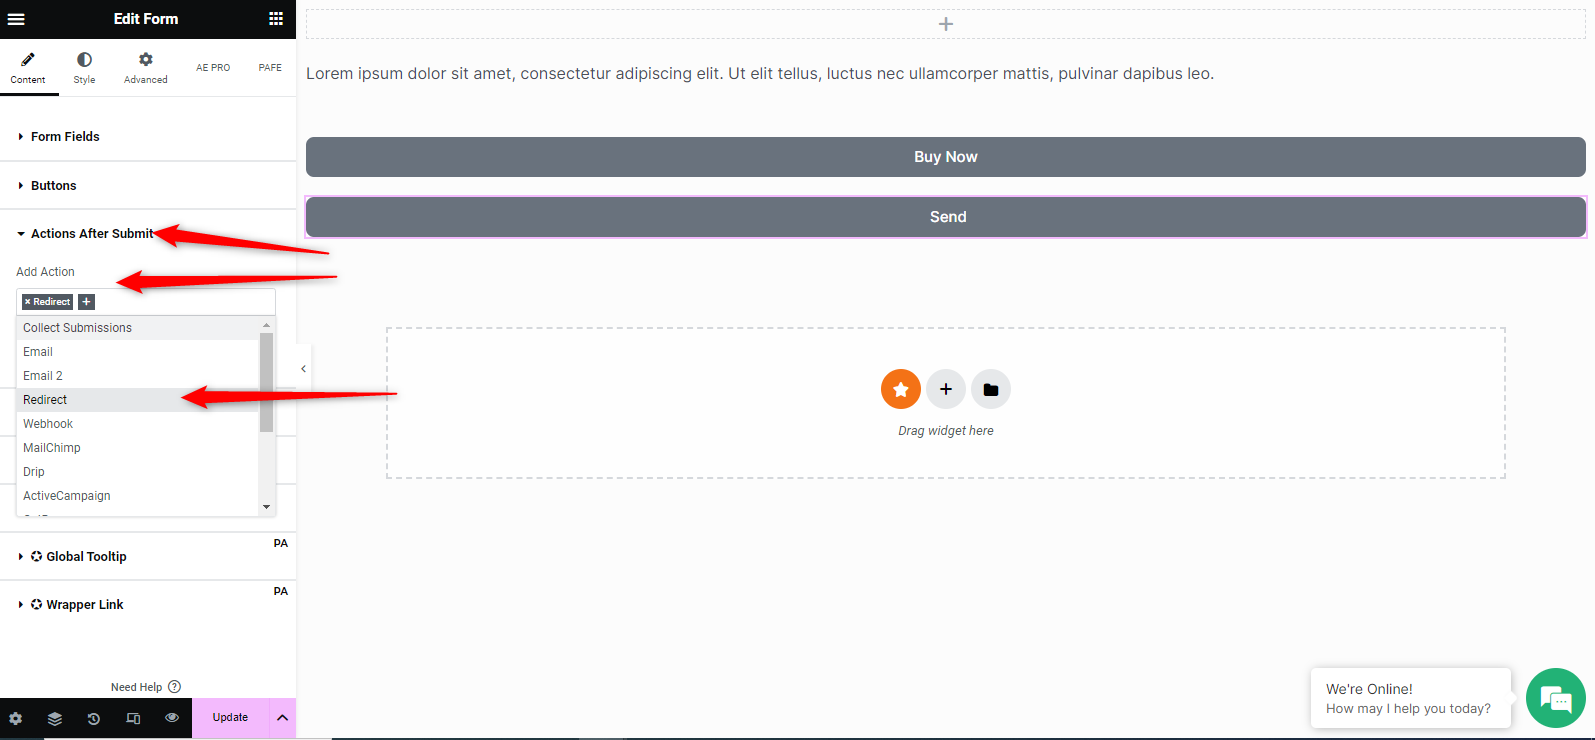
Configure the form submission action:
Under Add Action - Chose Redirect option
Step 4: Add Redirect URL with Prefilled UTM Parameters
In the Redirect URL field, enter the checkout page link. Modify the checkout page link to include placeholders for UTM parameters using the Shortcode unique IDs obtained in Step 2.
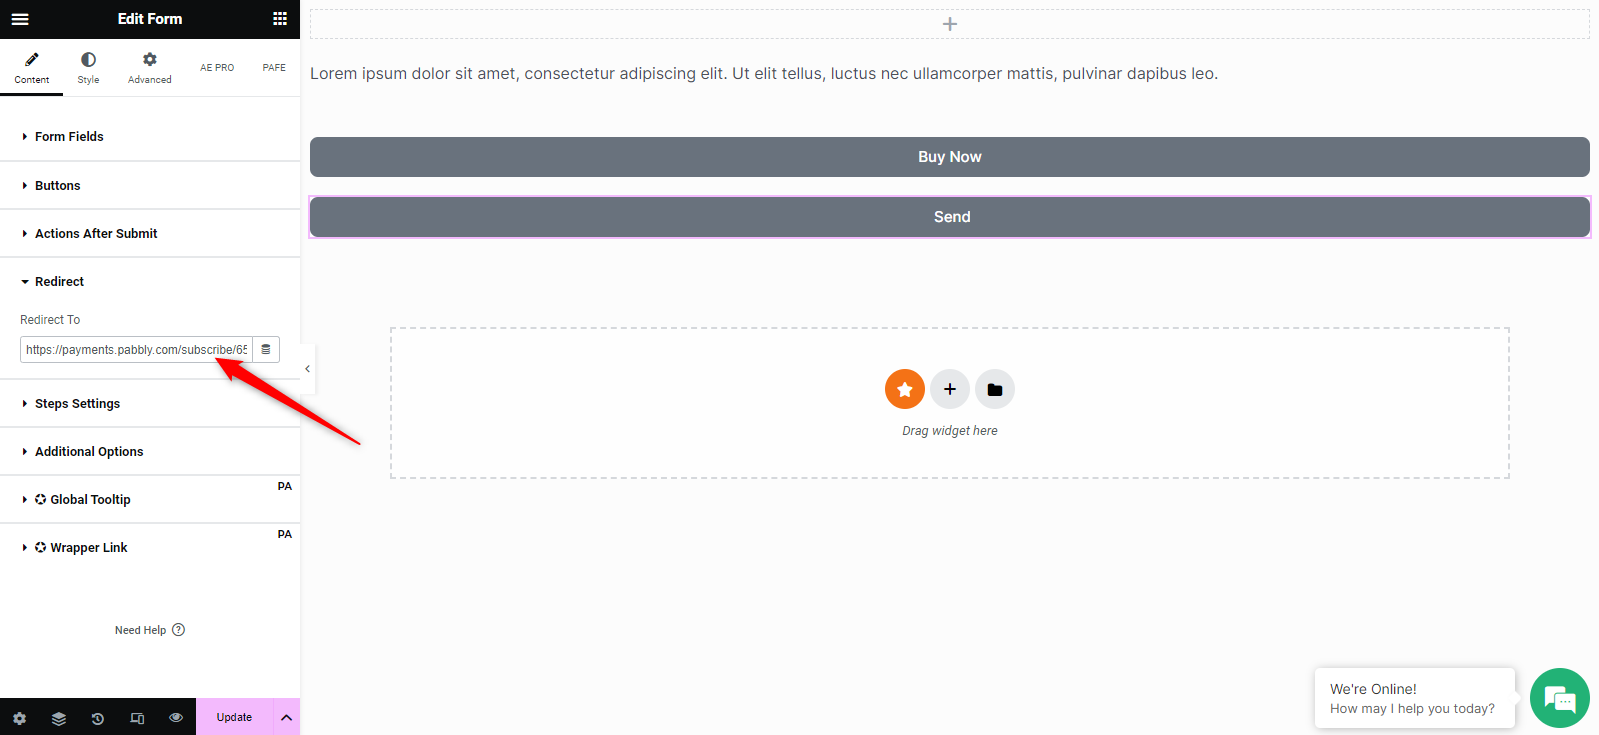
Example:
Redirect URL: https://payments.pabbly.com/subscribe/65b7510711160157dfddd8b8/main-plan-2?utm_source=[field id="field_e053b59"]
(Checkout page link where you to redirect)?”Field name in the checkout page”=[Shortcode]
Now you can test and check whether the fields on the checkout page are populating correctly.
By following these steps, you have successfully configured your Elementor form to capture UTM parameters from the URL and pass them to the Pabbly Subscription Billing checkout page. Ensure that the UTM parameters are correctly prefilled in the redirect URL to provide a seamless experience for your customers.
Please note :- Before passing the UTM parameters please make sure the same custom fields are created on your checkout page.
Step 1: Add a Form on to website
If your website does not have a form, follow these steps to add one using Elementor:
- Navigate to the page where you want to add the form.
- Edit the page with Elementor.
- Drag and drop the Form widget onto the desired section of your page.
Step 2: Create UTM Fields in the Form
To capture and store UTM parameter values from the URL, create same UTM fields in the form:
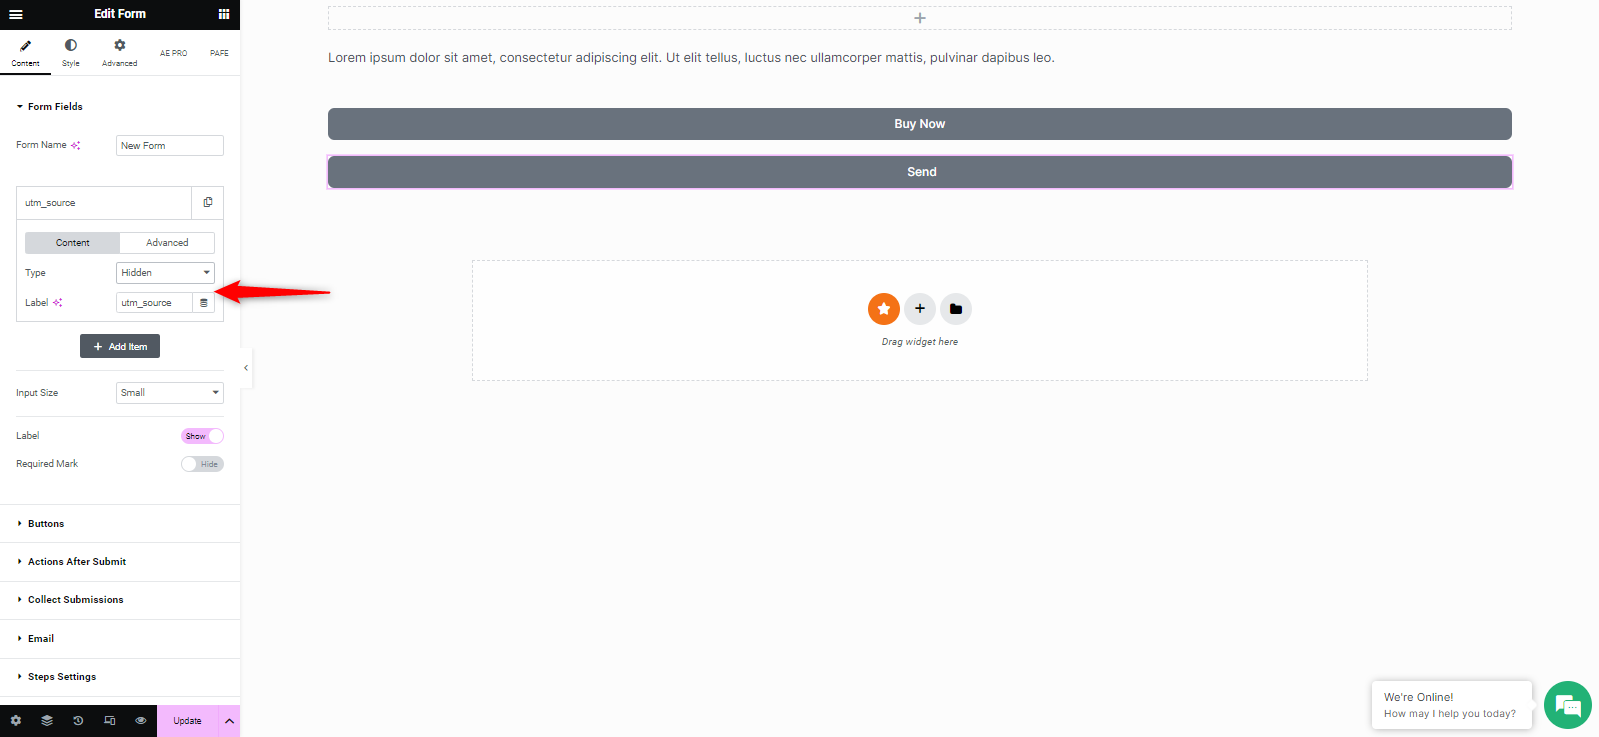
- To add a field click on add item . Now Under the content section
- - In the settings, set "Type" to Hidden.
- - Set "Field Name(Label)" to the desired UTM field name, for example utm_source.
Under Advanced Options, set the Default Value to "Site - Request Parameter."
Select the field again or tap on the gear icon to set the Request Parameter option. Choose "GET" for the type and enter the UTM field name (e.g., utm_source) in the Parameter Name.
Example:
In Content
- Type as Hidden
- Field Name(label): utm_source
- Default Value: Site - Request Parameter
- Type: GET
- Parameter Name: utm_source
Copy the Shortcode(unique ID) generated for each field; you will use this ID for prefilling the checkout page.
Step 3: Set Button Submission Action to Redirect
Configure the form submission action:
Under Add Action - Chose Redirect option
Step 4: Add Redirect URL with Prefilled UTM Parameters
In the Redirect URL field, enter the checkout page link. Modify the checkout page link to include placeholders for UTM parameters using the Shortcode unique IDs obtained in Step 2.
Example:
Redirect URL: https://payments.pabbly.com/subscribe/65b7510711160157dfddd8b8/main-plan-2?utm_source=[field id="field_e053b59"]
(Checkout page link where you to redirect)?”Field name in the checkout page”=[Shortcode]
Now you can test and check whether the fields on the checkout page are populating correctly.
By following these steps, you have successfully configured your Elementor form to capture UTM parameters from the URL and pass them to the Pabbly Subscription Billing checkout page. Ensure that the UTM parameters are correctly prefilled in the redirect URL to provide a seamless experience for your customers.
Please note :- Before passing the UTM parameters please make sure the same custom fields are created on your checkout page.
Last edited by a moderator:
