Configure SLA refers to setting up Service Level Agreements within Pabbly Chatflow.
An SLA is a commitment that defines the maximum time your team has to respond to and resolve customer messages or issues. Configuring SLA helps you:
Follow these steps to define and manage SLA (Service Level Agreement) rules inside your Pabbly Chatflow account to improve customer response times and support quality.
The SLA duration will be calculated based on the hours and minutes entered.
For example, if you configure 12 hours and 30 minutes, the due time for responding to each WhatsApp message will be set 12 hours and 30 minutes after the message is received.

Setting up SLAs ensures that your team responds within an agreed timeframe, improving customer satisfaction and maintaining service standards.
An SLA is a commitment that defines the maximum time your team has to respond to and resolve customer messages or issues. Configuring SLA helps you:
- Set clear expectations for response and resolution times.
- Ensure timely customer support.
- Monitor if your team is meeting response goals.
- Improve customer satisfaction by maintaining quality support standards.
Follow these steps to define and manage SLA (Service Level Agreement) rules inside your Pabbly Chatflow account to improve customer response times and support quality.
Step 1: Log in to Your Pabbly Chatflow Account
Access your Pabbly Chatflow dashboard by signing in with your credentials.Step 2: Navigate to SLA Configuration
- Go to the Settings module.
- In the navigation panel, click on Configure SLAs.
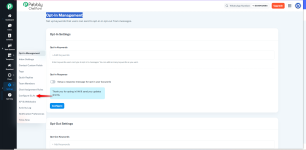
Step 3: Set SLA Duration
- Enter the SLA values in hours and minutes.
- This defines the maximum time allowed to send the first reply and fully resolve the conversation after a customer’s message is received.
- Your team members must respond within the specified SLA duration.
- If they fail to respond within the given SLA time, the SLA will be marked as exceeded.
The SLA duration will be calculated based on the hours and minutes entered.
For example, if you configure 12 hours and 30 minutes, the due time for responding to each WhatsApp message will be set 12 hours and 30 minutes after the message is received.
Step 4: Save Your SLA Configuration
After entering the SLA durations:- Click Save to activate the SLA settings across all incoming customer chats.
Setting up SLAs ensures that your team responds within an agreed timeframe, improving customer satisfaction and maintaining service standards.
Attachments
Last edited: