
This documentation provides a comprehensive, step-by-step guide to understanding the OAuth 2.0 setup process. For example purposes, we have chosen "HubSpot CRM" as our focus application.

 We followed the Hubspot API docs for selecting the Auth type as Oauth2.0 Learn more


Trigger - Company Updated (Polling method)
In this type of integration, you need to configure Get API similar to Post webhook trigger integration to fetch new data in a specific interval.


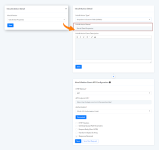
The New Record Order Setting section as shown below allows you to tell Pabbly Connect about how it can recognize the fetched record is new.
Unique Record ID: Choose a unique record ID from the received response of the above step that uniquely identifies the new record.
Sorting Order: Since the fetched records may be single or a bunch so, it is important to identify the record as new it may be based on any specific field of the new data like date value. Based on its value, the system compares the old data with this one and processes it for triggering if it finds any difference.
In case, there is no such field value present in the response, you can opt for By Position and locate the new record's presence either at the top or at the bottom of the bunch of JSON responses.

Trigger Frontend View:

Action - Search a Deal
Action Event API Configuration with JSON Request Body Type -

propertyName parameter is set as a Dynamic dropdown field.

Note: To configure the field details click on the gear button respective to the specific parameter.
Now, select the available inbuilt action events from the dropdown field as shown below:

It is required to generate dropdown field values in the action event, you need to make use of the Inbuilt Action step just above the Action Event API Configuration section by clicking the plus (+) button.
 (1).png")
Action Frontend View:

For further details, refer to this guide for creating new actions and triggers in your application. Learn more
Refer to the video below for instructions on creating your app with a similar authentication type: Learn more
- App Details and Auth Configuration.
We followed the Hubspot API docs for selecting the Auth type as Oauth2.0 Learn more- How to Configure Triggers Events:
Trigger - Company Updated (Polling method)
In this type of integration, you need to configure Get API similar to Post webhook trigger integration to fetch new data in a specific interval.
- In the above screenshot, we have used the inbuilt action that will list out company properties.
- After that, we set the parameter as "Properties" to add a multi-select dynamic dropdown.
- Set the Request Body JSON.
- Save and Send the test request and fetch the response.
The New Record Order Setting section as shown below allows you to tell Pabbly Connect about how it can recognize the fetched record is new.
Unique Record ID: Choose a unique record ID from the received response of the above step that uniquely identifies the new record.
Sorting Order: Since the fetched records may be single or a bunch so, it is important to identify the record as new it may be based on any specific field of the new data like date value. Based on its value, the system compares the old data with this one and processes it for triggering if it finds any difference.
In case, there is no such field value present in the response, you can opt for By Position and locate the new record's presence either at the top or at the bottom of the bunch of JSON responses.
Trigger Frontend View:
- How to Configure Action Event:
Action - Search a Deal
Action Event API Configuration with JSON Request Body Type -
- HTTP request method - POST
- API Endpoint URL - "https://api.hubapi.com/crm/v3/objects/deals/search"
- Request Body Type - Specify a request body type to request this action event. By default, it is JSON.
- Wrap in Array - Specify if your request raw JSON needs to be wrapped in an array or not.
- Set Body/Query Parameters - Set parameters if this action event requires passing the query/URL parameters or mapping in request raw JSON e.g. Property name.
- Request Body (Raw JSON) - Select this if this action event requires passing the raw JSON data. If used in endpoints then, all variables in it defined under the Set parameters option should have the required option opted. (Some API accepts blank values for JSON keys).
propertyName parameter is set as a Dynamic dropdown field.Note: To configure the field details click on the gear button respective to the specific parameter.
Now, select the available inbuilt action events from the dropdown field as shown below:- How to set up an Inbuilt Action Event:
It is required to generate dropdown field values in the action event, you need to make use of the Inbuilt Action step just above the Action Event API Configuration section by clicking the plus (+) button.
Action Frontend View:
For further details, refer to this guide for creating new actions and triggers in your application. Learn moreRefer to the video below for instructions on creating your app with a similar authentication type: Learn moreAttachments

Last edited by a moderator: