In Pabbly Connect, the Header Authentication option allows for API requests to be authenticated through the use of a key-value pair in the headers.
To utilize this option, it is necessary to specify the header key for every individual action or trigger event within your application. This means that for each action event you create, you must specify the header key so that the API request can be properly authenticated.
By choosing the Header Authentication option, you ensure that the API request will be authorized using the key-value pair located in the headers, providing a secure and effective way to authenticate API requests.
In order to use the Header authentication for your custom app, you need to select the Headers option under your App configuration section as shown below:

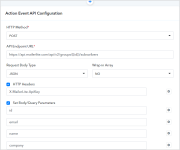
Now, you need to configure the Header parameter for each and every action or trigger of your app.
Here is an example of MailerLite app action configured with Header Auth -

Similarly, you need to configure the same Header key for other actions or trigger events of your app.
Your App connection will look like this -

To utilize this option, it is necessary to specify the header key for every individual action or trigger event within your application. This means that for each action event you create, you must specify the header key so that the API request can be properly authenticated.
By choosing the Header Authentication option, you ensure that the API request will be authorized using the key-value pair located in the headers, providing a secure and effective way to authenticate API requests.
In order to use the Header authentication for your custom app, you need to select the Headers option under your App configuration section as shown below:
Now, you need to configure the Header parameter for each and every action or trigger of your app.
Here is an example of MailerLite app action configured with Header Auth -
Similarly, you need to configure the same Header key for other actions or trigger events of your app.
Your App connection will look like this -