• Instructions to Ask a Question

    Click on the "Ask a Question" button and select the application for which you would like to ask questions.

    We have 5 different products namely - Pabbly Connect, Pabbly Subscription Billing, Pabbly Email Marketing, Pabbly Form Builder, Pabbly Email Verification.

    The turnaround time is 24 hrs (Business Hours - 10.00 AM to 6.00 PM IST, Except Saturday and Sunday). So your kind patience will be highly appreciated!

    🚀🚀Exclusive Discount Offer

    Just in case you're looking for any ongoing offers on Pabbly, you can check the one-time offers listed below. You just need to pay once and use the application forever -
     

    🔥 Pabbly Connect One Time Plan for $249 (🏆Lifetime Access) -  View offer 

    🔥 Pabbly Subscription Billing One Time Plan for $249 (🏆Lifetime Access) - View offer

I want to add a custom field or attribute in my plan.

binaya

Member
I want to add a custom field or attribute in my plan. We multiple plans in pabbly subscription plan but we want to display these plans in different place in our app so, we need to add a custom field to recognize the plan via api & display according to that.
 

MukeshR

Member
Staff member
Hello @binaya ,
To create custom fields in Pabbly Subscription Billing, follow the steps below:

1. Navigate to "Product" > "Plans."
2. Hover over the plan for which you want to create custom fields.
3. Click on the three dots option.
4. Select "Checkout Customerizer."
5. From the block section, choose the custom field option.
6. Inside the custom field block, you'll find options to create the custom field according to your requirements. Save the changes.

For additional guidance, please refer to the screenshot provided for more details.
1703593080350.png


1703593133995.png


1703593182598.png


Regarding prefilling values in fields on the checkout page, you can find detailed instructions in the help document at the following link:
https://forum.pabbly.com/threads/prefill-fields-on-the-checkout-page-custom-and-normal-fields.6106/
This document demonstrates how to retrieve pre-filled values for both custom and normal fields on the checkout page.
 

Attachments

  • 1703593026826.png
    1703593026826.png
    69.8 KB · Views: 24

binaya

Member
Hello @MukeshR ,
Thank you for the response but i want to add custom field or some attribute in the plan that we create for subscription.
Product > Plan.
Screenshot 2023-12-26 at 9.37.34 PM.png

I want to add new field in here.
 

MukeshR

Member
Staff member
Hello @binaya ,

Could you please inform us about the specific custom fields you need in the plan section? This information will assist us in gaining a more detailed understanding of your use case and enable us to provide the necessary support. As currently, we do not have the option to create additional fields in the plan section.
 

binaya

Member
Hi @MukeshR ,
We want to display different type of subscription dynamically & we have different kind of subscription that might be placed in different pages in our app. We want to use this custom field to determine where to place the plan without making any changes in our app while creating new plans in future.
 

MukeshR

Member
Staff member
Hello @binaya ,
For the use case you've described, you can use the "Plan Metadata" feature available in the plan settings to incorporate additional data into the plan as per your specific requirements. The values assigned to plan metadata remain static and only undergo changes when manually updated during the plan editing process. This allows you to effectively use this for your use case.

To add plan metadata to your plan, please follow the steps outlined below:


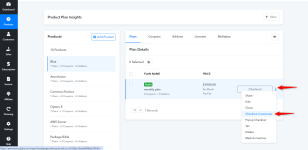
1. Navigate to Products > Plan.
2. Hover over the desired plan for which you intend to add plan metadata.
3. Click on the three dots option.
4. Select "Edit" from the menu.
5. On the opened plan page, Scroll down to the bottom of the page, where you will find options such as Subscription Status, Description, Redirect URL, Metadata, Payment Failed Settings, and Payment Term Mark the checkbox for this option
7. Check the box for plan metadata and modify the values according to your requirements.
By following these steps, you can successfully integrate plan metadata into your plan to fulfill the specified use case.
Please refer to the below screenshot for more details

1703757698576.png

1703757668712.png
 
Top