Pabbly Subscription Billing provides a versatile feature that allows you to implement Popup Checkout Pages on your website. Popup checkout pages offer a seamless payment experience without redirecting users to a different page, contributing to better conversion rates. Follow this guide to successfully implement Popup Checkout Pages.
Step 1: Creating plan
The process of creating plan involves providing basic information like amount, billing cycle etc to get your hosted payment page created. You can learn how to create plans by watching this video.
Step 2: Go to customizer
To navigate to the customizer, you'll have to click on the three dots menu on the right of the plan's name.

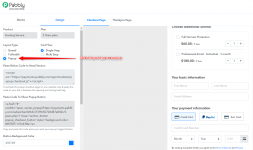
Step 3: Click on the background of the page to get the option to select the layout.

Step 4: Select the layout type
Select "popup" from the option to select layout type and save.

Step 5: Pasting code in the header
The first code that you see in the smaller box needs to in the header of your website. This code is common for all the pop checkout pages that you'll create. For example, if you'll put three popups for three different plans on the same page, you'll have to insert this code once in the head of the webpage.

Step 6: Pasting code under the BUY Button
The code in the larger box needs to go under the buy button or the part on which the popup needs to appear when clicked. This code is unique for all the popup checkout pages that you've created. If you have three different plans, you simply need to paste the respective codes under the buy button.

Step 7: That's all! It's done.
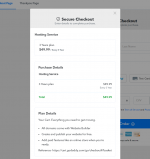
The process has been completed. You can reload your website and see your popup checkout page appear when the button is clicked. If it doesn't appear, please try clearing cache data and it would fix the problem.

This is the default view of the popup checkout page. You can use the checkout customizer to make customizations in appearance if required.
Implementing Multiplan Popup Checkout Pages:
Implementing a multi-plan checkout page in a popup layout is no different than implementing a single-plan popup checkout page. All you need to do is change the checkout page URL in the popup button code.
For example, if this is the single plan popup checkout code -
Then you just need to replace the checkout page URL with the multi-plan checkout page URL.
NOTE:
If you are facing any error with WordPress such as WordPress replacing the default code, then you can use the below-given code in order to implement the pop-up checkout page.
Here is the video tutorial for your better understanding -
Step 1: Creating plan
The process of creating plan involves providing basic information like amount, billing cycle etc to get your hosted payment page created. You can learn how to create plans by watching this video.
Step 2: Go to customizer
To navigate to the customizer, you'll have to click on the three dots menu on the right of the plan's name.
Step 3: Click on the background of the page to get the option to select the layout.
Step 4: Select the layout type
Select "popup" from the option to select layout type and save.
Step 5: Pasting code in the header
The first code that you see in the smaller box needs to in the header of your website. This code is common for all the pop checkout pages that you'll create. For example, if you'll put three popups for three different plans on the same page, you'll have to insert this code once in the head of the webpage.
Step 6: Pasting code under the BUY Button
The code in the larger box needs to go under the buy button or the part on which the popup needs to appear when clicked. This code is unique for all the popup checkout pages that you've created. If you have three different plans, you simply need to paste the respective codes under the buy button.
Step 7: That's all! It's done.
The process has been completed. You can reload your website and see your popup checkout page appear when the button is clicked. If it doesn't appear, please try clearing cache data and it would fix the problem.
This is the default view of the popup checkout page. You can use the checkout customizer to make customizations in appearance if required.
Implementing Multiplan Popup Checkout Pages:
Implementing a multi-plan checkout page in a popup layout is no different than implementing a single-plan popup checkout page. All you need to do is change the checkout page URL in the popup button code.
For example, if this is the single plan popup checkout code -
<a onclick="open_center_popup(' ?is_popup_preview=true')" class="anchor_button popup_checkout_button" style="background-color: #007bff; color: #ffffff;">Click Me</a>
Then you just need to replace the checkout page URL with the multi-plan checkout page URL.
That's All!<a onclick="open_center_popup(' ?is_popup_preview=true')" class="anchor_button popup_checkout_button" style="background-color: #007bff; color: #ffffff;">Click Me</a>
NOTE:
If you are facing any error with WordPress such as WordPress replacing the default code, then you can use the below-given code in order to implement the pop-up checkout page.
<a id="popUp" onclick="" class="anchor_button popup_checkout_button" style="background-color: #007bff; color: #ffffff;">Click Me</a>
<script>
document.getElementById("popUp").addEventListener("click", showPopUp);
function showPopUp() {
open_center_popup('https://payments.pabbly.com/subscri...ebook-purchase-checkout?is_popup_preview=true')
}
</script>
<script src="https://payments.pabbly.com/api/checkout/popup-checkout.js"></script>
Here is the video tutorial for your better understanding -
Attachments
Last edited by a moderator: