Plan
A plan defines how you sell a product. Collect recurring/one-time payments, set up fees, trials, and more. Plans include different billing cycles. Creating a plan generates a checkout page for customer purchases.How To Set Up Plans For The Product?
1. Go to the “Products” section and select the product to add a plan.
2. Click on “Add Plan”.
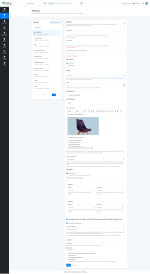
3. Fill up the details of the plan. Here is how the form looks like
Plan Name
For example: If you’re offering basic services or features to your customer then you can name your plan as – “Basic” & when offering the advanced featured you can name it as – “Advanced Plan”. It will be displayed on the invoice that you’ll send to your customer.
Plan Code
Here you can add a unique code of the product which acts as a unique identifier.
In what currency do you want to sell?
Here you can add the pricing of a plan in a specific currency. Pabbly Subscriptions supports 25+ currencies such as Dollar, Euro, INR etc.
Billing Cycle: Whether you want to sell your plan as monthly or one-time.
One-time: Customers will be charged once.
Recurring: Customers will be charged Weekly, Monthly or Yearly as per the plan.
Pricing:
1. Flat Fee:
This is for plans that have a fixed charge. There is no quantity associated with such plans. Watch how to create plan with flat fee pricing
Note: To create a free plan, keep the price amount as zero.
2. Per Unit:
This is for plans that have a plan amount that changes according to the quantity. For instance: $19 is the plan amount for a single quantity, then for 5 quantities, it would be $19*5 = $95. Watch how to create plan with per unit pricing
Note: To create a free plan, keep the price amount as zero.
3. Volume:
You can set a range of quantities and set per unit price for each range. For example, you can charge $50 per unit from people who buy 1-20 units (1st range) and $30 per unit from those who buy 21-30 units (next range). Watch how to create plan with volume pricing
Note: To create a free plan, keep the price amount as zero.
4. Tiered:
The per-unit prices are assigned to quantity-based ranges (tiers). When calculating the total price, quantities are purchased from successive tiers, starting from the lowest. Example: From 1 to 10 units, the price would be $50 and from 11 & above the price would be $20. Now, if the customer purchases 11 units, then the total payable amount would be $520. (For 10 units = 10*$50 and for 11th unit = 1*$20). Watch how to create plan with tiered pricing.
5. Stairstep:
Stairstep Pricing model allows you to charge as per a range of quantities that you decide,irrespective of the number of quantities. From 1 to 10 units, the price would be $50 and from 11 and above, the price would be $20. Now, if the customer purchases 11 units, the total payable amount would be $20. (For 11 units, there is a fixed price of $20). Watch how to create plan with stairstep pricing.
6. Donation/Pay Your Own Price:
Here, the customer has the option to add the amount as per their choice. You can mention the minimum amount to be paid by the customer. Example: If the minimum amount is $10, then your customer must pay at least $10 for your product, but can choose to pay more. Watch how to create plan with donation pricing.
7. Variable Pricing ( Dimesale / Timesale ):
In the variable pricing plan, the plan amount changes according to the number of sales or hours. Example: For the first 10 sales, the amount is $50, for the next 10, it is $60, and the next 10 after that amounts to $70. Watch how to create plan with Variable pricing.
Add Setup Fee (Optional):
Enter the setup fee. It is a one-time fee that will be charged only once at the starting of the billing cycle. Herer we give the option of charging the setup fee as fixed and quantity wise.
Fixed Fee: This type of setup fee is fixed. This is not dependent on the quantity.
Quantity-wise: This type of setup fee is changed according to the plan quantity.
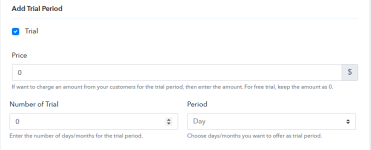
Add Trial Period:
Plan Description:
Enter a short description about the plan. You can customize the description by styling the text and adding images as well. This will be shown on the checkout page. Image size should be 400W x 250H, Max Size - 100kb.
Payment Gateway:
Select a specific/all Payment Gateways to collect payments for this plan, the selected gateways will be shown on the checkout page. Before going LIVE, Please disable the test gateway from the payment gateway integration to avoid the test payments during the LIVE mode.
Note: The gateways that you have added in your Pabbly Subscription Billing account will be shown in this payment gateway list.
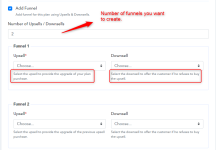
Add Funnel:
Select Payment Failed Setting (Optional):
You can show the other payment gateways in case of failed payment. Example: If the customer's payment is failed via Stripe gateway, you can show other integrated payment gateways to them for processing the payment.
Note: The gateways that you have added in your Pabbly Subscription Billing account will be shown in this payment gateway list.
Redirect URL After Successful Payment (Optional):
Enter a custom link to redirect your customers after a successful purchase. Or, leave the field blank to use the default Thank You page. Link Formate: https://www.example.com. In the case of SEPA and BOLETO, the redirect URL will work for payments in progress status as well.
NOTE: The redirect URL will not work, in the case of Razorpay subscription or if you have added any funnel on this plan.
Payment Term (Optional):
By setting a payment term, you can allow some number of days to make payment. For example, if you select Net15 that means your customer has 15 more days to make the payment from the subscription billing date.
NOTE: Payment term will not work in case of Razorpay subscription & PayPal.
Plan Metadata (Optional):
These meta data field helps you to include some additional data in the plan. For example you can add the details about assigned plan limits of your product like {"tasks":"50000","workflows":"1000"}.
Metered Plan (Optional):
Metered plans are managed via API. Check the documentation to learn more about metered plan. Learn more.
4. Finally, Click On The “Add” Button: After entering all the details, click on save button to create the plan.
Now, your products, their corresponding plans, and their buying links have been created. So, you are now ready to collect payments for your products & services.
You can see the checkout pages of each plan and also copy the link and embed it on your website.
Checkout Page:
Default Thank You page:
Attachments
Last edited by a moderator: