This documentation serves as a comprehensive guide for the proper implementation of help text within Pabbly Connect during the process of creating an application integration. The content presented here is surrounded by detailed information on triggers and actions, clarifying the method of structuring help text effectively in co-occurrence with your application.
Note: It plays a crucial role in enhancing user comprehension of the implementation process. Strict adherence to these instructions will contribute to a more seamless and understandable integration experience for our users.
New Leads, Create Contact. It is not suggested to put the value like this: New leads or create contact.


If you have to write Example in the description. It should be written in the format. E.g. John
If you are adding a Trigger or an Action event name in Beta stage. You should write the name as Beta. Do not use BETA or beta or any other format. Always use Beta in brackets.
For E.g. New Email (Beta)
Happy Integrating !!
Note: It plays a crucial role in enhancing user comprehension of the implementation process. Strict adherence to these instructions will contribute to a more seamless and understandable integration experience for our users.
- Actions/Triggers Names:
New Leads, Create Contact. It is not suggested to put the value like this: New leads or create contact.
- Action/Trigger Description:
In a few words describe the functionality of the Action/Trigger. Detail the action/trigger functionality briefly in the third person, adhering to standard sentence structure with only the initial letter of the first word capitalized.
- Adding Descriptive Help Text to Connection Field Settings:
1. Write proper sentences and standards like "API Key", not API key or api key, or as mentioned in the application’s API documentation/dashboard.
2. Use links wherever possible also check if it is redirecting to the new window option.
3. For a single parameter, you can write the Help Texts at the App level instead of writing to each endpoint level as shown below:
4. It is preferable to use a Parameter as the chosen Authentication Type, with the inclusion of a header within the corresponding action, is recommended.
5. Instructions must be precise and simple and if possible add navigation links to the API area of the app.
- For Basic Auth-based authentication applications:
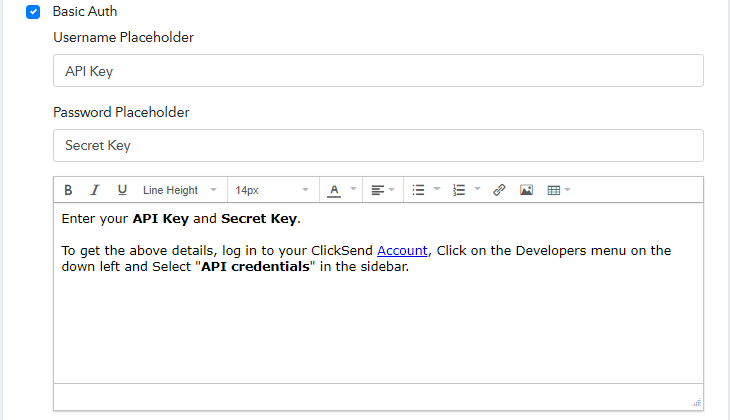
1. Make use of a placeholder and write the exact parameter to be input e.g. API Key (K not k), Secret Key (K not k), you can check any previous app for reference.
2. In the description, input "Enter your API Key and Secret Key," followed by a single line break. Provide instructions on where to locate this information within the application.
3. In certain scenarios, only the first field of Basic Auth is necessary, and the second field should be left blank. Insert a placeholder for the first field and leave the second one as is. For instance, the first line of the description could be "Enter your API Key and leave the Password field blank."
4. Use links wherever possible and check if it is redirecting to the new window option.
5. Ensure that instructions are clear and straightforward. Refer to the provided screenshot for guidance.
- Instructions for adding help text for action/trigger fields:
When setting up the Action/Trigger Event API Configuration section, it is imperative to include appropriate help text with examples for all parameters/variables, as demonstrated in the screenshots below.
1. In the parameter section, choose the setting to access the Label Name and Description options.
2. Craft sentences with proper structure and adhere to established standards, such as "Label Name - First Name."
3. Ensure that help text is provided carefully, including relevant examples within it.
If you have to write Example in the description. It should be written in the format. E.g. John
If you are adding a Trigger or an Action event name in Beta stage. You should write the name as Beta. Do not use BETA or beta or any other format. Always use Beta in brackets.
For E.g. New Email (Beta)
Happy Integrating !!
Last edited by a moderator:

