
Table of Contents
- Overview
- Prerequisites
- Security Requirement: Whitelisting Pabbly Integration Server
- Step 1: Whitelist IP Address in MongoDB Atlas
- Step 2: Retrieve MongoDB Connection String
- Step 3: Establish MongoDB Connection in Pabbly Connect
- Step 4: Configure MongoDB Action
- Step 5: Test and Save the Workflow
- Common Errors and Troubleshooting
- Final Verification Checklist
1. Overview
The MongoDB integration in Pabbly Connect enables users to automate database operations such as inserting, updating, retrieving, and deleting records from MongoDB Atlas through workflow-based automation.To ensure secure and uninterrupted communication between Pabbly Connect and MongoDB Atlas, proper IP whitelisting and authentication are mandatory.
2. Prerequisites
Before proceeding, ensure the following requirements are met:- An active MongoDB Atlas account
- A running MongoDB cluster
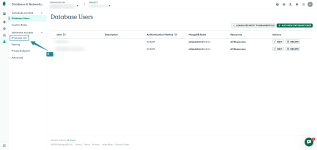
- A MongoDB database user with appropriate permissions
- Access to Pabbly Connect
3. Security Requirement: Whitelist Pabbly Integration Server
MongoDB Atlas enforces IP-based access control. To allow Pabbly Connect to communicate with your cluster, the Pabbly Integration Server IP must be whitelisted.Pabbly Integration Server IP
Server IP: 157.180.81.74 Important: Failure to whitelist this IP will result in connection and authentication failures.
4. Step 1: Whitelist IP Address in MongoDB Atlas
4.1 Sign in to MongoDB Atlas
- Visit https://cloud.mongodb.com
- Log in using your credentials
 Screenshot: MongoDB Atlas Dashboard
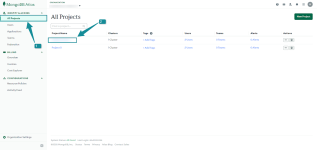
4.2 Select Your Project
- Choose the project that contains your MongoDB cluster
Screenshot: Project Selection4.3 Open Network Access Settings
- Navigate to Network Access from the left sidebar
- Open the IP Access List section
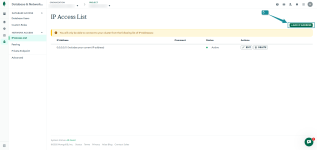
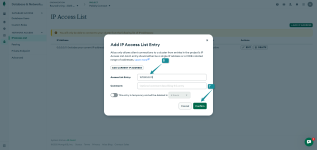
Screenshot: IP Access List4.4 Add Pabbly Integration Server IP
- Click Add IP Address
- Enter the IP address: 157.180.81.74
- (Optional) Add a description
- Click Confirm
Screenshot: Add IP AddressExpected Outcome:
The IP address appears with an Active status.
5. Step 2: Retrieve MongoDB Connection String
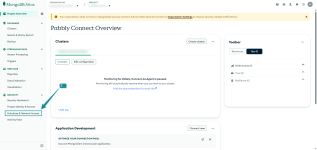
5.1 Navigate to Clusters
- Go to Database → Clusters
- Click Connect on the target cluster
Screenshot: Cluster Overview5.2 Select Connection Method
- Choose Connect your application
Screenshot: Connection Options5.3 Copy Connection String
- Select the appropriate driver
- Copy the provided connection string
Screenshot: Connection String Note:
Note:Replace <username>, <password>, and <database> with your actual MongoDB credentials.
6. Step 3: Establish MongoDB Connection in Pabbly Connect
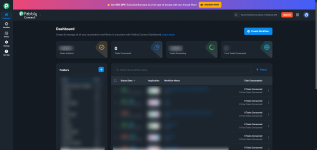
6.1 Access Pabbly Connect
- Log in to Pabbly Connect
- Create a new workflow or open an existing one
6.2 Add MongoDB Action
- Click Add Action
- Select MongoDB
- Choose the required action/event
6.3 Create a New Connection
- Click Add New Connection
- Paste the MongoDB connection string
- Click Connect
The connection status displays Connected.
7. Step 4: Configure MongoDB Action
- Select the database name
- Select the collection name
- Map all required input fields according to the selected MongoDB action
Note: Ensure all mandatory fields are mapped correctly to avoid execution failures.8. Step 5: Test and Save the Workflow
8.1 Test the Action
- Click Save & Send Test Request
- Review the response returned by MongoDB
8.2 Save and Enable Workflow
- Click Save
- Enable the workflow for execution
Expected Outcome: The workflow executes successfully without validation or runtime errors.
9. Common Errors and Troubleshooting
Connection Failed
- Verify IP address is whitelisted
- Check MongoDB username and password
- Confirm database name in the connection string
Authentication Failed
- Ensure MongoDB user permissions are correctly assigned
- Verify read/write access for the database
Timeout or Network Error
- Allow a few seconds after IP whitelisting
- Retry the connection
10. Final Verification Checklist
✔ MongoDB Atlas account active✔ Pabbly Integration Server IP whitelisted
✔ MongoDB user created with correct permissions
✔ Connection string verified
✔ MongoDB connected in Pabbly Connect
✔ Action tested successfully
✔ Workflow saved and enabled
Completion Status
You have successfully configured MongoDB with Pabbly Connect. Your workflows are now ready to perform secure and automated database operations.Attachments
-
 1766751984219.png72.6 KB · Views: 140
 -
 1766752006969.png141.6 KB · Views: 148
 -
 1766752034951.png103 KB · Views: 144
 -
 1766752051645.png88.8 KB · Views: 143
 -
 1766752062186.png126.5 KB · Views: 136
 -
 1766823204452.png72.6 KB · Views: 131
 -
 1766824327098.png158.7 KB · Views: 137
 -
 1766824437188.png502.1 KB · Views: 138
Last edited: