
This guide explains how to connect your Bitrix24 account with Pabbly Connect so you can automate CRM actions like creating or updating leads, deals, contacts, and
more.
more.
Overview
- Create a Bitrix24 Account
- Collect Required Details from Bitrix24
- Create a Local Application in Bitrix24
- Connect Bitrix24 with Pabbly Connect
- Enter Connection Details
Prerequisites
Before starting, make sure you have:- An active Bitrix24 account
- An active Pabbly Connect account
- Admin access to Bitrix24 (required to create applications)
Step 1: Create a Bitrix24 Account
If you don’t already have a Bitrix24 account, create one using the link below:
 Register here:
 https://www.bitrix24.com/register/
After registration:- Log in to your Bitrix24 dashboard
Step 2: Collect Required Details from Bitrix24
You will need three important details from Bitrix24 to connect it with Pabbly Connect:
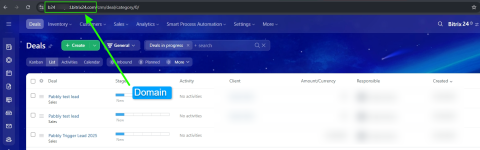
1. Bitrix24 Domain
- Example: b24-83hkkf.bitrix24.com
- You can find this directly in your browser URL when you are logged into the Bitrix24 dashboard.
 Tip: Copy only the domain part (without https://).
2. Client ID
3. Client Secret
These will be generated by creating a Local Application in Bitrix24.
Step 3: Create a Local Application in Bitrix24
Follow the steps below carefully:
Navigation Path
From your Bitrix24 Dashboard:
➡ Left Sidebar → Applications
➡ Developer Resources
➡ Other
➡ Local Application
Application Configuration
Fill in the form with the following values:
Field Name Value Application Type Server Handler Path Initial Installation Path Leave blank Menu item text English (en) * Your choice of text
Assign Permissions
Click + Select and assign all the following permissions:
✔ CRM
✔ USER
✔ CASHBOX
✔ DOCUMENTGENERATOR
✔ TASK
✔ TASK_EXTENDED
 Important: Missing permissions may cause actions or triggers to fail later.
Save Credentials
After saving the application:- Copy the Client ID
- Copy the Client Secret
- Store them securely (you will need them in Pabbly Connect)
Step 4: Connect Bitrix24 with Pabbly Connect
- Log in to your Pabbly Connect account
- Create a new workflow
- Select Bitrix24 as the app
- Choose any available Action Event
- Click Connect
Step 5: Enter Connection Details
In the connection popup, enter the following:
Field Value Bitrix24 Domain Your Bitrix24 domain Client ID Copied from Bitrix24 Client Secret Copied from Bitrix24
Click Save.
If all details are correct: Connection Successful
- Double-check your domain format
- Ensure all permissions are enabled
- Make sure Client ID & Secret are copied correctly
- Do not modify the Handler Path
Attachments

Last edited: