
This guide will help you locate the Client ID, Client Secret, and API scopes required to connect your Shopify store using OAuth authentication.
Open your browser and go to:
https://admin.shopify.com
Log in using your Shopify store credentials.
After logging in, click on Settings from the left-side menu.

Click on Develop apps.
If prompted, allow access to create and manage developer apps.

Click on Build apps in the Dev Dashboard.
You will be redirected to the Shopify Developer Dashboard.


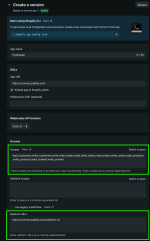
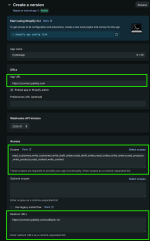
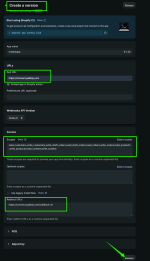
6.2 Provide app name and click on create

6.3 Create a version
Provide the fields data


Copy and store these values securely, as they will be required for the OAuth setup when creating a Shopify connection in the Pabbly Connect platform.
For creating a connection, you will need:
Note: Make sure your Shopify app has all the required API scopes enabled to successfully perform actions in Shopify through the Pabbly Connect platform.
Prerequisites
- You must have admin access to the Shopify store.
- A Shopify app should already be created in the Shopify Dev Dashboard.
Step 1: Log in to Shopify Admin
Open your browser and go to:
https://admin.shopify.com
Log in using your Shopify store credentials.
Step 2: Open Settings
After logging in, click on Settings from the left-side menu.
Step 3: Go to Apps Section
In Settings, click on AppsStep 4: Open Develop Apps
Click on Develop apps.
If prompted, allow access to create and manage developer apps.
Step 5: Open Dev Dashboard
Click on Build apps in the Dev Dashboard.
You will be redirected to the Shopify Developer Dashboard.
Step 6: Create Your App
6.1 Click on Create app6.2 Provide app name and click on create
6.3 Create a version
Provide the fields data
- App URL :
Pabbly
 connect.pabbly.com
- Scopes: Select all scopes, as they define the permissions your app requests.
- Redirect URLs:
- then, click on release.
- Your app version is created successfully.
Step 7: Open App Settings
Inside the app, click on Settings from the left-side menu.Step 8: Find Client ID and Client Secret
In the Credentials section, you will find:- Client ID
- Client Secret
Copy and store these values securely, as they will be required for the OAuth setup when creating a Shopify connection in the Pabbly Connect platform.
Step 9: Install your app
Complete the following steps to install your app on a store:- From your app, select Home in the left-panel of the Dev Dashboard.
- Select Install app.
- Select or create the store for your app.
- Select Install.
Step 10: Find your Shopify subdomain (required for authentication)
To find your Shopify Subdomain. follow the steps below:- Login to your Shopify account.
- Go to Settings → General.
- Now, look at the browser address bar (URL) at the top.
- Your subdomain appears after /store/ in the URL.
xhf4aq-xm
- Copy and store the subdomain E.g. xhf4aq-xm , as it will be required for the OAuth setup when creating a Shopify connection in the Pabbly Connect platform.
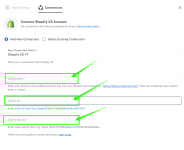
Step 11: Create Connection in Pabbly Connect Platform
For creating a connection, you will need:
- Your Shopify subdomain (refer to step 10 above)
- Client ID (refer to step 7 and step 8 above)
- Client Secret (refer to step 7 and step 8 above)
- After filling out all the required fields, click on Save
- Now your connection is successfully established and you are ready to perform actions in your Shopify Store through Pabbly Connect.
Note: Make sure your Shopify app has all the required API scopes enabled to successfully perform actions in Shopify through the Pabbly Connect platform.
Attachments


Last edited: