
Connecting Wix with Pabbly Connect (New Authentication Flow)
This guide explains how to connect your Wix account with Pabbly Connect using Wix’s new App Instance–based authentication flow.
It also covers permissions, webhooks, and instance ID extraction, which are mandatory as per Wix’s latest requirements.
Prerequisites
Before you begin, make sure you have:- A Wix account
- An App created in Wix Developer Center
- Access to Pabbly Connect
Overall Flow (High Level)
- Create a workflow in Pabbly Connect
- Capture App Installed webhook from Wix
- Extract Instance ID from webhook (JWT)
- Use App ID + App Secret + Instance ID to connect Wix
Step 1: Create a Workflow in Pabbly Connect
- Log in to Pabbly Connect
- Click Create Workflow
- Select Webhook by Pabbly as the trigger
- Copy the Webhook URL
- Click on Capture Webhook Response.
You will use this URL in Wix to capture the App Installed event.
Step 2: Create “App Installed” Webhook in Wix
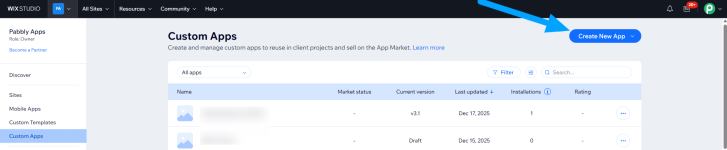
- Open Wix Custom Apps dashboard
https://manage.wix.com/studio/custom-apps - Search for your app.
- Click the three dots (⋯) next to your app
- Select Go to App Dashboard
- Navigate to:
Develop → Webhooks - Click Create Webhook
- Configure the webhook:
- Category: App Instance
- Event: App Installed
- Callback URL: Paste the Pabbly Webhook URL (from Step 1)
- Save: Click Subscribe
Step 3: Install the App on Your Wix Site
- From the app dashboard, click Distribute App dropdown
- Click Install on a Site
- Select your site where you want to install the app
As soon as the app is installed, Wix will fire the App Installed webhook.
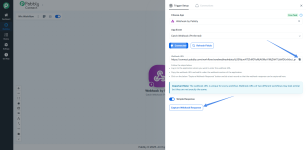
Step 4: Capture Webhook Response in Pabbly
- Go back to your Pabbly workflow
- The webhook trigger will receive a response automatically
 Important Note
The webhook response is in JWT (encoded) format and is not a JSON format.
You must extract the Instance ID from it.
Step 5: Extract Instance ID (Mandatory Step)
- Add a new action step in Pabbly
- Choose:
- App: Data Transformer (Pabbly)
- Action Event: Wix Instance ID Extractor
- Click connect
- Provide:
- The JWT token received from the webhook
- Click Save & Send Test Request
- You will now see the Instance ID in the response.
- Copy and save this Instance ID — you will need it to create the Wix connection.
Step 6: Add Required Permissions in Wix (Very Important)
If you try to perform actions like Get Contact, Create Contact, etc. without permissions, Wix will return a 403 Forbidden error.
How to Add Permissions
- Go to your Wix App Dashboard
- Navigate to:
Develop → Permissions - Click + Add Permissions
- Add the permissions required for your use case
Example:- Contacts & Members → Read / Create / Update Contacts
- Wix Stores → Manage Products
- Any other scope your actions need
- Click Save
Step 7: Release a New Version of the App
After adding permissions:- Go to your Wix App Dashboard
- Click Release New Version
Permissions only take effect after releasing a new version.Step 8: Reinstall the App (Mandatory After Permission Change)
If your app was already installed on a site:- Go to Wix Site Dashboard, https://manage.wix.com/studio/sites?referralInfo=sidebar&viewId=all-items-view
- Navigate to:
Sites → [click on your site] → Apps → Manage Apps
- Uninstall / Remove your app
- Reinstall the app again (Refer to Step 3)
Why this is required:
Wix grants permissions only at install time.Reinstallation allows the app to grasp the newly added permissions.
 When you reinstall:
- The App Installed webhook fires again
- Pabbly captures a new JWT
Step 9: Connect Wix in Pabbly Connect
- Add a new action step in your workflow
- Choose:
- App: Wix
- Action Event: (Example: Get Contact by Email)
- Click Connect
- Select Add New Connection
- Enter:
- App ID
- App Secret Key
- Instance ID (from Step 5)
- Click Save
Your Wix connection is now established successfully.
Start Using Wix Actions!
Attachments
Last edited: