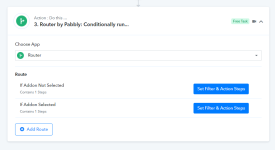
The use case is to redirect customers to different web pages depending on whether they've selected addons or not after their payment was successful. So if you're using Pabbly Connect too, this can easily be done. Here's how 
.
To set up a conditional redirect to redirect users to different thank you pages depending upon the order total, you can follow the steps below. Now, this amount can vary if the user has selected an addon or bump offer.
.
Step 1: Create a workflow in your Pabbly Connect account with the trigger “subscription activate” in Pabbly Subscription Billing.

.
Step 2: Add the trigger webhook URL in the “Redirect URL after Successful payment” field by editing the plan on which you want to set up redirection.

.
Step 3: Do a checkout with a test card and capture the webhook response. The response would include the hosted page ID which would be used to fetch subscription data.

.
Step 4: Choose the API module in the next step of the workflow. Make an API call known as Get Hosted Page Data API. The response would bring all the data like customer email, plan ID, etc. Link to the API: https://apidocs.pabbly.com/...
.
Step 5: Choose “Router” in the third step with two routes(You can have more than two routes if there are more than two conditional redirects).

.
Step 6: In the first route, choose the first step as a filter and select label as “Data Invoice Amount”, filter type as “Equals” and value as your plan’s amount without an addon.

.
Step 7: In the first route, choose the second step as “Data Forwarder by Pabbly”, Action event as “Redirect to” and enter the URL on which you want your customers to be redirected if they haven’t selected add-ons. The redirect status should be “301 Moved Permanently”.

Step 8: In the second route, you need to follow the same steps that are in steps 6 and 7. But in the filter, you’ll select the label “Data Invoice Amount”, filter type as “greater than” and the value should be the plan amount. In the data forwarder module, you need to follow the steps of step 7 except the “Redirect to” URL needs to be the one on which you want your customers to be redirected if they’ve selected add-ons.


.
Step 9: That’s all. Save the workflow and do two test checkouts(One with add-ons and one without add-ons) to see the magic happening!
Workflow Link - https://connect.pabbly.com/workflow...XPQJdBGRfSwIGCV8JelBKBjkHGFYLW2hSFwdYACoMbg##
This is a test workflow for the same use case. If desired, you can use this workflow link directly for the same use scenario.
.
To set up a conditional redirect to redirect users to different thank you pages depending upon the order total, you can follow the steps below. Now, this amount can vary if the user has selected an addon or bump offer.
.
Step 1: Create a workflow in your Pabbly Connect account with the trigger “subscription activate” in Pabbly Subscription Billing.
.
Step 2: Add the trigger webhook URL in the “Redirect URL after Successful payment” field by editing the plan on which you want to set up redirection.
.
Step 3: Do a checkout with a test card and capture the webhook response. The response would include the hosted page ID which would be used to fetch subscription data.
.
Step 4: Choose the API module in the next step of the workflow. Make an API call known as Get Hosted Page Data API. The response would bring all the data like customer email, plan ID, etc. Link to the API: https://apidocs.pabbly.com/...
.
Step 5: Choose “Router” in the third step with two routes(You can have more than two routes if there are more than two conditional redirects).
.
Step 6: In the first route, choose the first step as a filter and select label as “Data Invoice Amount”, filter type as “Equals” and value as your plan’s amount without an addon.
.
Step 7: In the first route, choose the second step as “Data Forwarder by Pabbly”, Action event as “Redirect to” and enter the URL on which you want your customers to be redirected if they haven’t selected add-ons. The redirect status should be “301 Moved Permanently”.
Step 8: In the second route, you need to follow the same steps that are in steps 6 and 7. But in the filter, you’ll select the label “Data Invoice Amount”, filter type as “greater than” and the value should be the plan amount. In the data forwarder module, you need to follow the steps of step 7 except the “Redirect to” URL needs to be the one on which you want your customers to be redirected if they’ve selected add-ons.
.
Step 9: That’s all. Save the workflow and do two test checkouts(One with add-ons and one without add-ons) to see the magic happening!
Workflow Link - https://connect.pabbly.com/workflow...XPQJdBGRfSwIGCV8JelBKBjkHGFYLW2hSFwdYACoMbg##
This is a test workflow for the same use case. If desired, you can use this workflow link directly for the same use scenario.
Attachments
Last edited by a moderator:

