How to Create Custom Fields In Pabbly Subscription Billing
Custom fields in Pabbly Subscription Billing allow you to gather additional information from your customers during the checkout process. This feature enhances your ability to tailor the subscription experience and collect relevant data. Follow the steps below to create and add custom fields to the checkout page.
Steps to Create Custom Fields:
1. Go to the 'Product' section in your Pabbly Subscription Billing dashboard.
2. Choose the specific plan for which you want to add custom fields.
3. Hover over the chosen plan. Click on the three dots option.
4. Select Checkout Customizer Option
5. Inside Checkout Customizer Go to Block Section:
6. Select 'Choose Custom Fields' from the menu.
7. In the custom field block, you can create a new custom field based on your requirements.
Different Options for Creating Custom Fields:
1. Custom Fields Position:
- Choose where you want the custom fields to appear.
- Display below the basic information section.
- Display below the billing & shipping address field.
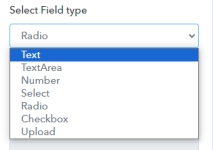
2. Select Field Type:
Choose the type of custom field from the following options:
- Text
- Textarea
- Number
- Ratio
- Select
- Upload
- Checkbox
-Date
3. Field Label:
Write a label for the custom field to clearly indicate its purpose.
4. Field Key:
Assign a unique key to the custom field for identification.
5. Field Requirements:
Select whether the custom field is required or disabled.
By following these steps, you can enhance your checkout process by collecting valuable information through custom fields in Pabbly Subscription Billing. If you encounter any issues or have further questions, please reach out to support team at [email protected]
Attachments
Last edited by a moderator: