
Pabbly Action Builder - Guide for Creating Custom Action Step APIs
Pabbly Action Builder allows you to create custom action step APIs for your Pabbly Connect workflows using AI. Simply describe what you need in plain English, and the AI will plan, generate code, and deploy a live API endpoint on Pabbly Functions -- which you can then use as a custom action step in any workflow via cURL/HTTP Request.
Step 1: Access Action Builder
1. Log in to your Pabbly Connect account.
2. In the left sidebar, click on Action Builder.
3. You will see the main dashboard with three tabs:
- Build -- Chat with AI to create integrations
- Integrations -- View and manage your deployed integrations
- AI Settings -- Configure your AI provider

Step 2: Configure AI Settings (First-Time Only)
Before creating your first integration, you need to set up an AI provider.
1. Click the AI Settings tab.

2. You will see two AI provider options:
- Anthropic (Recommended) -- Claude Opus 4.6, Sonnet 4.6, Haiku 4.5

- OpenRouter -- Access 200+ models via a single API

3. Expand the Anthropic card by clicking on it.
4. Choose your authentication method:
- API Key -- Get your key from console.anthropic.com. It starts with
- Setup Token -- Run
5. Paste your key/token in the input field.
6. Click Test to verify the key works.
7. Select your preferred AI model (Claude Sonnet 4.6 is recommended).
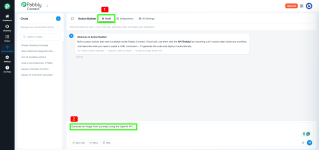
Step 3: Describe What You Want to Build
1. Go to the Build tab.
2. In the chat input at the bottom, describe what you want to build. Be specific about:
- Which external API or service to use
- What action(s) the integration should perform
- What input parameters it needs
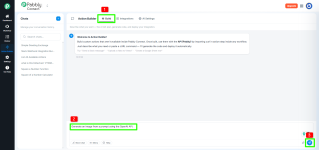
Example prompts:
3. Press Enter to send your message.

Step 4: Review the AI Plan
After you send your description, the AI will present a plan card showing:
If the plan looks correct:
Click Yes, build it! to proceed.
If you want changes:
Type your modification in the chat (e.g., "also add a delete action").

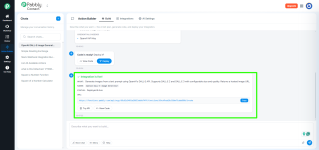
Step 5: Code Generation & Deployment
Once you approve the plan:
1. The AI generates the code in real-time -- you can watch it stream in the code panel.

2. Click Deploy to deploy the integration to Pabbly Functions.

3. You'll see the "Integration is live!" success card with:
- The invoke URL (your API endpoint)
- Try API button to test it immediately
- View Code button to see the generated code

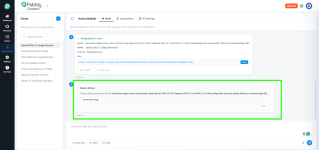
Step 6: Test Your Integration
1. Click the Try API button on the success card.
2. Select which action to test.
3. Fill in the required parameters.
4. Add your credential headers (API keys, tokens).
5. Click Run to send a test request.
6. The API Console panel opens.
7. The response appears showing the status code and JSON data.

Step 7: Use in Pabbly Connect Workflow
Now that your integration is live, use it as a custom action step:
1. In your workflow, add an API / Webhook by Pabbly action step (or HTTP Request / cURL).
2. Set the method to POST.
3. Paste your integration's invoke URL.
4. Set
5. Add credential headers (e.g.,
6. Set the body as JSON:

7. Map the fields from previous workflow steps.
Updating an Existing Integration
1. Open the chat where you built the integration (in the Chats sidebar).
2. Type your change request, e.g.:
- "Add a delete action"
- "Fix the error handling"
- "Change the response format"
3. The AI shows an update plan with specific code changes.
4. Click Apply Change 1 of N to apply each change.
5. Updated code is automatically redeployed.
Response Format
All integrations follow a standard response format:
Success (HTTP 200):
Error (HTTP 400/401/500):
Common Error Codes
Tips for Best Results
Limits
If you have any questions, feel free to reply to this thread.
Pabbly Action Builder allows you to create custom action step APIs for your Pabbly Connect workflows using AI. Simply describe what you need in plain English, and the AI will plan, generate code, and deploy a live API endpoint on Pabbly Functions -- which you can then use as a custom action step in any workflow via cURL/HTTP Request.
Note: Action Builder uses AI to generate code. You need to configure an AI provider API key in AI Settings before building your first integration.
Step 1: Access Action Builder
1. Log in to your Pabbly Connect account.
2. In the left sidebar, click on Action Builder.
3. You will see the main dashboard with three tabs:
- Build -- Chat with AI to create integrations
- Integrations -- View and manage your deployed integrations
- AI Settings -- Configure your AI provider
Step 2: Configure AI Settings (First-Time Only)
Before creating your first integration, you need to set up an AI provider.
1. Click the AI Settings tab.
2. You will see two AI provider options:
- Anthropic (Recommended) -- Claude Opus 4.6, Sonnet 4.6, Haiku 4.5
- OpenRouter -- Access 200+ models via a single API
3. Expand the Anthropic card by clicking on it.
4. Choose your authentication method:
- API Key -- Get your key from console.anthropic.com. It starts with
sk-ant-api03-...- Setup Token -- Run
claude setup-token in your terminal and paste the generated token.5. Paste your key/token in the input field.
6. Click Test to verify the key works.
7. Select your preferred AI model (Claude Sonnet 4.6 is recommended).
Important: Your API key is stored securely and never exposed in the generated code or logs.
Step 3: Describe What You Want to Build
1. Go to the Build tab.
2. In the chat input at the bottom, describe what you want to build. Be specific about:
- Which external API or service to use
- What action(s) the integration should perform
- What input parameters it needs
Example prompts:
- "Send a Slack message to a channel using a webhook URL"
- "Generate an image from a text prompt using OpenAI DALL-E 3"
- "Create a new row in Google Sheets using the Google Sheets API"
- "Send an SMS using Twilio API"
- "Upload a video to Vimeo from a URL"
3. Press Enter to send your message.
Step 4: Review the AI Plan
After you send your description, the AI will present a plan card showing:
- What it will build -- 2-3 bullet points describing the integration
- Supported actions -- The API actions it will create
- Credentials needed -- API keys, tokens, or webhook URLs required
If the plan looks correct:
Click Yes, build it! to proceed.
If you want changes:
Type your modification in the chat (e.g., "also add a delete action").
Step 5: Code Generation & Deployment
Once you approve the plan:
1. The AI generates the code in real-time -- you can watch it stream in the code panel.
2. Click Deploy to deploy the integration to Pabbly Functions.
3. You'll see the "Integration is live!" success card with:
- The invoke URL (your API endpoint)
- Try API button to test it immediately
- View Code button to see the generated code
Step 6: Test Your Integration
1. Click the Try API button on the success card.
2. Select which action to test.
3. Fill in the required parameters.
4. Add your credential headers (API keys, tokens).
5. Click Run to send a test request.
6. The API Console panel opens.
7. The response appears showing the status code and JSON data.
Step 7: Use in Pabbly Connect Workflow
Now that your integration is live, use it as a custom action step:
1. In your workflow, add an API / Webhook by Pabbly action step (or HTTP Request / cURL).
2. Set the method to POST.
3. Paste your integration's invoke URL.
4. Set
Content-Type: application/json header.5. Add credential headers (e.g.,
X-Api-Key: your_key).6. Set the body as JSON:
JSON:
{
  "action": "your_action_name",
  "param1": "value from previous step",
  "param2": "another value",
  "invoked_by": {
    "name": "Pabbly Connect",
    "email": "[email protected]"
  }
}
7. Map the fields from previous workflow steps.
Updating an Existing Integration
1. Open the chat where you built the integration (in the Chats sidebar).
2. Type your change request, e.g.:
- "Add a delete action"
- "Fix the error handling"
- "Change the response format"
3. The AI shows an update plan with specific code changes.
4. Click Apply Change 1 of N to apply each change.
5. Updated code is automatically redeployed.
Response Format
All integrations follow a standard response format:
Success (HTTP 200):
JSON:
{
  "statusCode": 200,
  "statusMessage": "OK",
  "success": true,
  "data": "your result here"
}
Error (HTTP 400/401/500):
JSON:
{
  "statusCode": 400,
  "statusMessage": "Missing required field: name",
  "success": false,
  "error": "Missing required field: name"
}
Common Error Codes
- 200 - Success
- 400 - Bad Request (missing/invalid input)
- 401 - Unauthorized (bad or missing credentials)
- 404 - Not Found (unknown action name)
- 429 - Rate Limited by external API
- 500 - Internal Error
Tips for Best Results
- Be specific -- "Send a Slack message using incoming webhook" works better than "Slack integration"
- Mention the API -- "Use OpenAI's DALL-E 3 API" helps the AI choose the right endpoint
- One integration at a time -- Build focused integrations
- Test before using in workflows -- Always use Try API first
- Keep credentials secure -- Pass API keys via HTTP headers
Limits
- Message length: 50,000 characters
- File attachment size: 20 MB per file
- Supported file types: PNG, JPEG, GIF, WebP, PDF
- Chat history: Unlimited
- Integrations: Unlimited
If you have any questions, feel free to reply to this thread.
Attachments
Last edited: