
This documentation offers a comprehensive, step-by-step guide to integrating your Toggl Track account with Pabbly Connect. By following these instructions, you can effortlessly establish a seamless connection between the two platforms.
.png")
.png")
.png")
===========================ACTIONS=============================
Toggl Track: Create a Client(Action Event)
Please follow below the steps to create a client for the above-mentioned action event:

=================================================================
Toggl Track: Create a Project(Action Event)
Please follow below the steps to create a project for the above-mentioned action event:

=================================================================
Toggl Track: Get Workspace Users(Action Event)
Please follow below the steps to get the list of users in a workspace for the above-mentioned action event:

=================================================================
Toggl Track: Create a Tag(Action Event)
Please follow below the steps to create a tag inside a workspace for the above-mentioned action event:

=================================================================
Toggl Track: Create a Task(Action Event)
Please follow below the steps to create a task inside a project for the above-mentioned action event:

=================================================================
Toggl Track: Create Time Entry(Action Event)
Please follow below the steps to create a time entry for the above-mentioned action event:

Successful Integration:
Upon completing the above steps, your Toggl account will now be successfully integrated with Pabbly Connect. You can utilize different actions and triggers according to your purpose. With this integration, you can automate processes through Pabbly Connect, improving your workflow and enhancing your productivity.
If you encounter any issues or require further assistance, feel free to reach out to our support team for help. ([email protected])
Happy integrating!
How to authorize Toggl Track in Pabbly Connect?
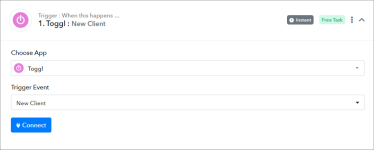
- Within Pabbly Connect, navigate to the action step and choose "Toggl Track" as the action you wish to perform. Select an action event, such as "Create a Client".
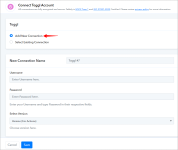
- To establish a connection, select "Add New Connection" and if you already have an existing connection, you can opt for "Select Existing Connection" instead.
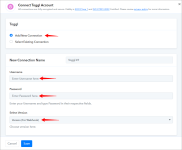
- To establish a new connection, select the "Add New Connection" radio button, and enter the Username and password.
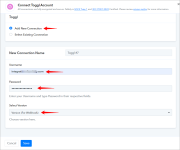
- Enter your registered email address in the Username field, and your account password in the Password field and click on the "Save" button.
===========================ACTIONS=============================
Toggl Track: Create a Client(Action Event)
Please follow below the steps to create a client for the above-mentioned action event:
- Use Case: To create a new client within the Toggl Track account.
- Select the "Create a Client" as an action event, connect your Toggl Track account, choose the connection type (either new connection or existing connection), and click the "Save" button (For help with authorization, check out the "How to authorize Toggl Track in Pabbly Connect?" section.)
- Choose or map the "Workspace" and enter the client name in the "Client Name" field.
- Click on "Save and Send Test Request".
=================================================================
Toggl Track: Create a Project(Action Event)
Please follow below the steps to create a project for the above-mentioned action event:
- Use Case: To create a new project within the Toggl Track account.
- Select the "Create a Project" as an action event, connect your Toggl Track account, choose the connection type (either new connection or existing connection), and click the "Save" button (For help with authorization, check out the "How to authorize Toggl Track in Pabbly Connect?" section.)
- Choose or map the "Workspace", enter the project name in "Project Name", and other required fields.
- Click on "Save and Send Test Request".
=================================================================
Toggl Track: Get Workspace Users(Action Event)
Please follow below the steps to get the list of users in a workspace for the above-mentioned action event:
- Use Case: To get the list of users in a workspace within the Toggl Track account.
- Select the "Get Workspace Users" as an action event, connect your Toggl Track account, choose the connection type (either new connection or existing connection), and click the "Save" button (For help with authorization, check out the "How to authorize Toggl Track in Pabbly Connect?" section.)
- Choose or map the "Workspace ID" field.
- Click on "Save and Send Test Request".
=================================================================
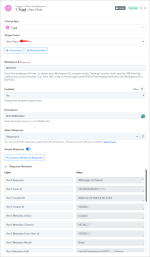
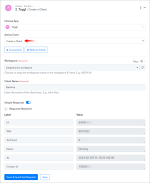
Toggl Track: Create a Tag(Action Event)
Please follow below the steps to create a tag inside a workspace for the above-mentioned action event:
- Use Case: To create a tag inside a workspace within the Toggl Track account.
- Select the "Create a Tag" as an action event, connect your Toggl Track account, choose the connection type (either new connection or existing connection), and click the "Save" button (For help with authorization, check out the "How to authorize Toggl Track in Pabbly Connect?" section.)
- Choose or map the "Workspace ", and enter the name in the "Name" field.
- Click on "Save and Send Test Request".
=================================================================
Toggl Track: Create a Task(Action Event)
Please follow below the steps to create a task inside a project for the above-mentioned action event:
- Use Case: To create a task inside a project within the Toggl Track account.
- Select the "Create a Task" as an action event, connect your Toggl Track account, choose the connection type (either new connection or existing connection), and click the "Save" button (For help with authorization, check out the "How to authorize Toggl Track in Pabbly Connect?" section.)
- Choose or map the "Workspace ", and "Project" and enter the name in the "Name" field.
- Click on "Save and Send Test Request".
=================================================================
Toggl Track: Create Time Entry(Action Event)
Please follow below the steps to create a time entry for the above-mentioned action event:
- Use Case: To create a time entry within the Toggl Track account.
- Select the "Create Time Entry" as an action event, connect your Toggl Track account, choose the connection type (either new connection or existing connection), and click the "Save" button (For help with authorization, check out the "How to authorize Toggl Track in Pabbly Connect?" section.)
- Choose or map the "Workspace ID", and enter the values in the "Start", "Duration", "Description", and "Created With" fields.
- Click on "Save and Send Test Request".
Successful Integration:
Upon completing the above steps, your Toggl account will now be successfully integrated with Pabbly Connect. You can utilize different actions and triggers according to your purpose. With this integration, you can automate processes through Pabbly Connect, improving your workflow and enhancing your productivity.
If you encounter any issues or require further assistance, feel free to reach out to our support team for help. ([email protected])
Happy integrating!
Attachments
Last edited: