
Pabbly Connect: Azure SQL Database Access Setup
Pabbly Connect allows applications to securely access your Azure SQL Database by whitelisting specific client IPs and retrieving the required database connection details. Follow the steps below to configure access safely.
Note: Ensure only trusted IPs are whitelisted. Incorrect configuration may block your application from connecting.
PART 1: Whitelisting a Specific Client IP for Azure SQL Database Access
PART 2: Obtaining Connection Details for Azure SQL Database Access
PART 1
1. Sign in to Azure Portal:
Step 1: Access Services

Step 2: Select Database

Step 3: Get Server Name
In the ADO.NET connection string box, copy:
Pabbly Connect allows applications to securely access your Azure SQL Database by whitelisting specific client IPs and retrieving the required database connection details. Follow the steps below to configure access safely.
Note: Ensure only trusted IPs are whitelisted. Incorrect configuration may block your application from connecting.
PART 1: Whitelisting a Specific Client IP for Azure SQL Database Access
PART 2: Obtaining Connection Details for Azure SQL Database Access
PART 1
Step-by-Step: Whitelisting a Specific Client IP for Azure SQL Database Access
Follow these steps to whitelist the IP address 157.180.81.74 for the Azure SQL server by adding it to the firewall rule IP range in the Azure portal. This will allow the application to access the database
1. Sign in to Azure Portal:
- Go to "SQL servers" or search for your SQL server name.
- Click on the actual SQL server resource (not just the individual database).
- In the left menu, click on "Networking" or "Firewalls and virtual networks".
- Under "Firewall rules", you’ll see an option like “Add client IP” or fields to specify “Start IP” and “End IP”.
- Click “Add client IP” to automatically fill in your current public IP, or manually enter your IP/range.
- Click “Save” to apply the rule.
PART 2
Step-by-Step: Obtaining Connection Details for Azure SQL Database Access
Follow these steps to obtain the details required for your application to connect to the Azure SQL database, including the server name, database name, username, and port.
Step 1: Access Services
- Go to the Azure Home Screen and click the Azure SQL Database icon.
Step 2: Select Database
- Find and click your database name (for example: pabbly_db) in the SQL databases list.
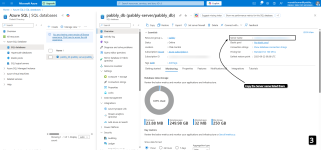
Step 3: Get Server Name
- On the Database Overview page, copy the Server name.
- In the left menu, go to Settings and select Connection strings.
In the ADO.NET connection string box, copy:
- The Database Name (shown as Initial Catalog=...)
- The Username (shown as User ID=...)
- The Port (typically at the end of the server address, e.g., 1433)
Attachments
Last edited: