Custom Domain Setup in Pabbly Subscription Billing
This documentation will guide you through the process of setting up a custom domain for your Pabbly Subscription Billing account. Custom domains allow you to use your own branded URL for your Checkout pages, affiliate URL etc, giving your business a more professional appearance.Introduction
Custom domains in Pabbly Subscription Billing allow you to replace the default Pabbly URLs with your own domain for subscription pages, payment gateways, and other billing-related services. This branding feature enhances the user experience and builds trust with your customers.Step 1: Navigate to Settings and click on 'Custom Domain', the below page will be displayed.
Step 2: Enter the name of your custom domain, for instance we are using "payments.satis.work". After this click on 'Map Custom Domain'.
Step 3: After this click on 'Map Custom Domain' and it will be updated successfully.
Step 4: Now, after this, you need to follow the mentioned steps. Follow these steps before submitting your custom domain name.
- Go to your domain name provider's website and locate the DNS management page.
- Add a CNAME record which points to “custom.pabbly.com” with the name of your custom domain.
- You can give any host name of your choice. For example, We are using "payments", as shown in the link below.
- Here is how it will look like in the DNS record:
- "payments.satis.work.com CNAME custom.pabbly.com"
Step 5: Go to your domain name provider's website, such as GoDaddy, since we purchased the domain from this website.
Step 6: Now, go to your DNS settings and click on 'Nameservers,' as we want to change the default name servers of GoDaddy to Cloudflare nameservers.
The reason we are using 'Cloudflare' is because it provides free SSL and Pabbly Subscription Billing only supports the cloudflare SSL.Step 7: Click on 'Change Nameservers'.
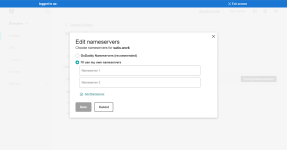
Step 8: As you click on 'Change Nameservers' you will get the following option, Here you have to select the option shown in the screenshot:
Step 9: Enter the name of the servers from Cloudflare here. To get the nameservers you have to login into your Cloudflare account and click on Get started.
Step 10: Now as you click on 'Get Started' you will get the option to enter the 'Domain Name' here you have to enter the domain name.
Step 11: When you click on 'Continue,' you will be presented with the option to select the plan. In this case, we are using the free plan provided by Cloudflare.
Step 12: Here, you need to enter the subdomain name, click on 'Add Record,' select the 'CNAME' option, and the default target URL will be 'custom.pabbly.com' and click on save.
Step 13: When you click on 'Save,' the following DNS record will be added successfully.
Step 14: When you click on 'Continue,' the following page will be displayed, where you will find the names of the Cloudflare servers that you need to enter in your GoDaddy account.
Step 15: After copying the nameservers, you need to paste them into your GoDaddy account. They will appear as follows:
Step 16: After entering the nameservers, click on 'Save.' Upon doing so, you will be prompted one more time to continue and proceed with updating Cloudflare's nameservers in your GoDaddy account. So here we have successfully updated the nameservers.
Step 17: After this go to DNS and check the updated nameservers name as shown.
Step 18: Now, after updating the nameservers, return to Cloudflare and click on 'Done' to check the nameservers, as shown below
Step 19: When you click on Done check nameservers, you will be directed to the page below, where you should click on 'Get Started' and save all the default values and click on finish.
Step 20: We have updated the nameservers, but we need to verify them. As shown, click on 'Check Nameservers'.
Step 21: When you click it, the system will check, and it usually takes up to 24 hours for the nameservers to be verified.
Step 22: Now, go to your Pabbly Subscription Billing account and click on 'Submit and Verify'.
Step 23: After the nameservers are verified, you can begin using the custom domain. A verified custom domain will appear as follows:
Step 24: Make sure you use the option 'flexible' as shown in the below screenshot.
For more details on how to verify if your custom domain is successfully connected to your Pabbly Subscription Billing account please refer to the below help document :- https://forum.pabbly.com/threads/how-to-verify-if-your-custom-domain-is-successfully-connected-to-your-pabbly-subscription-billing-account.18131/
For detailed video instructions on how to connect your custom domain inside Pabbly Subscription Billing, please refer to the following video:
Attachments
Last edited by a moderator: