
This guide walks you through generating an access token to enable Instagram DM automation using the Meta Developer Platform and creating a connection with it in Pabbly Connect.
Overview:
- Go to Meta Developers Portal
- Create a New App
- Select Use Cases
- Select Business Portfolio
- Open API Setup with Instagram Login
- Add Required Messaging Permissions
- Add Your Instagram Account as Tester
- Accept the Tester Invitation
- Access Token and Webhooks
- Generate Access Token and Copy Account ID
- Configure Webhooks
- Publish Your App
- Create a connection in Pabbly Connect
Prerequisites
- A public Instagram Professional or Business account
- A Meta (Facebook) account
- https://developers.facebook.com/docs/instagram-platform/overview
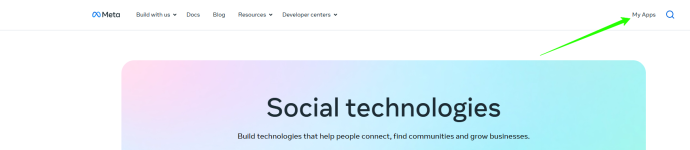
Step 1: Go to Meta Developers Portal
- Open developers.facebook.com
- Log in with your Facebook account
- Click My Apps in the top menu
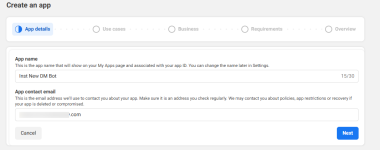
Step 2: Create a New App
- Click Create App
- Enter an App name (anything you like)
- Enter your App contact email
- Click Next
Step 3: Select Use Cases
- Choose Filter by Business messaging
- Choose Manage messaging & content on Instagram
- Click Next
Step 4: Select Business Portfolio
- Choose a business portfolio to connect, or select "I don't want to connect a business portfolio yet"
- Click Next and continue to the dashboard
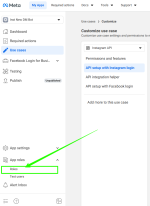
Step 5: Open API Setup with Instagram Login
- In your app Dashboard, go to the left sidebar
- Click on Use Cases
- Then , click on Customize
Step 6: Add Required Messaging Permissions
Under "1. Add required messaging permissions", make sure these are enabled:- instagram_business_basic
- instagram_manage_comments
- instagram_business_manage_messages
Step 7: Add Your Instagram Account as Tester
- Go to App roles → Roles in the left sidebar
- Click on Add People
- Search for your Instagram username
- Select Instagram Tester as the role and click Add
- The status will show Pending
Step 8: Accept the Tester Invitation
- Open Instagram (app or web)
- Go to Settings → Website permissions → Apps and websites
- Find your app and Accept the invitation
Note: Tokens can only be generated for public Instagram accounts.
Step 9.1: Generate Access Token and Copy Account ID
- Return to Meta Developer Portal
- Click on Use Cases, then click on Customize
- Under "2. Generate access tokens", find your Instagram account
- Click Generate token
- Copy the token immediately — it is displayed only once
- After that, toggle on the Webhook Subscription.
- Copy the account ID and save it somewhere.
Important: Keep this token secure. Do not share it publicly.
Step 9.2: Configure Webhooks
- Go to Use cases > Customize use case > API setup with Instagram login
- Go to Step 3 - Configure webhooks
- Provide these input field values:
Callback URL -https://pc-integrations.pabbly.com/webhooks/instagram/webhookurl
Verify Token: pabblyconnect
- Click on Verify and Save button.
- Now you will be able to see the available Webhook fields below, subscribe (turn on toggle) on all the fields.
Step 9.3: Publish Your App
- Goto Meta developers dashboard (home page)
- On the left hand side menu you can see Publish menu item, click on it.
- If required app settings are not completed, Then click on Go to app settings
- Provide the required input fields data:
App domains
Privacy policy URL
Terms of Service URL
Category - Go to bottom of the page and click save.
- Return to the Publish tab from the left menu.
- At the bottom, you can see Publish button, click on it.
- You will see a message that - Your app was successfully published.
Step 10: Create a connection in Pabbly Connect
- Goto Pabbly connect platform and create a workflow.
- Click on add trigger and choose your app "Instagram DM automation".
- Select App Event for an example "New message" and click on "connect".
- Provide data for input fields: Access Token and Account Identifier ( Refer to Step 9 ), and click on save
- Your connection is now ready to accept the webhook response.
Attachments
Last edited: